راهنماها

راهنماهای مرور (برای تغییر انتخاب کنید)

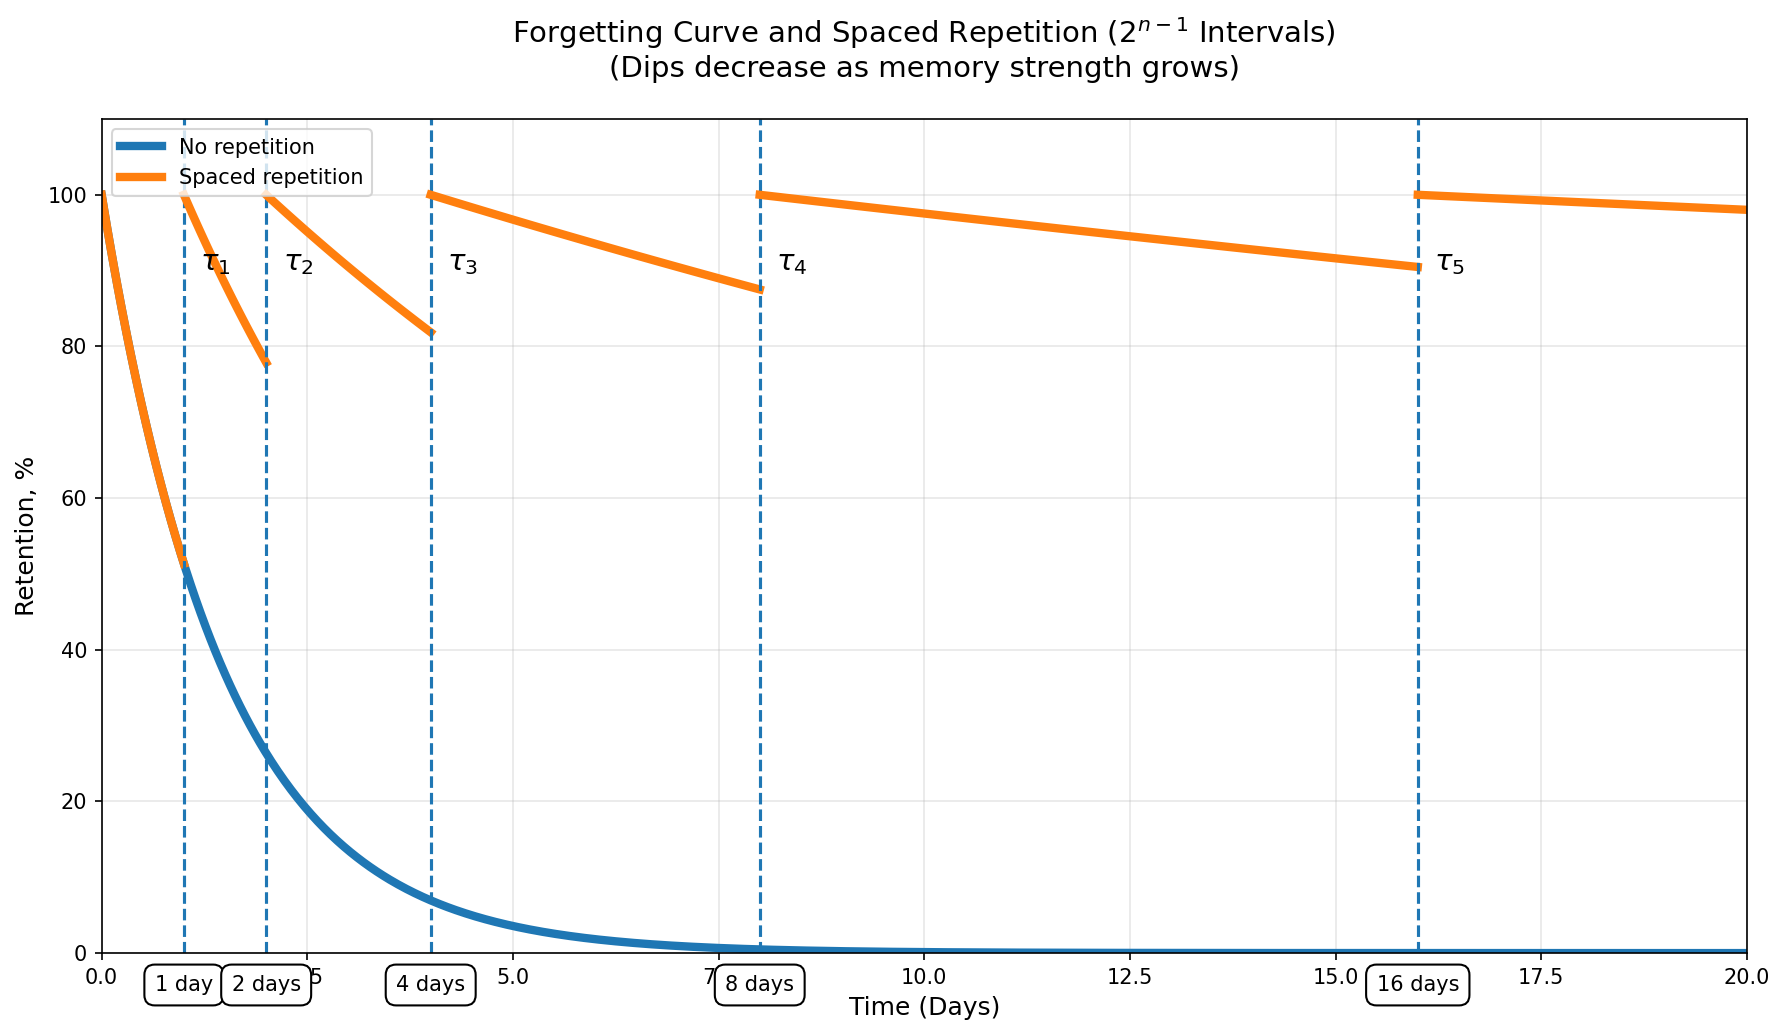
روش لایتنر ما چگونه کار می کند

MyLeitnerBox بر اساس روش لایتنر است، اما با ساختار بخش/زیربخش واضح برای تکرار فاصله اجرا شده است.

ساختار هسته

  • ما از ۵ بخش استفاده می‌کنیم.

  • هر بخش n شامل 2^(n-1) بخش های فرعی است.

  • بنابراین طول چرخه بازبینی عبارتند از:

  • بخش 1: 2^(1-1) = 1 بخش فرعی

  • بخش 2: 2^(2-1) = 2 بخش فرعی

  • بخش 3: 2^(3-1) = 4 بخش فرعی

  • بخش 4: 2^(4-1) = 8 بخش فرعی

  • بخش 5: 2^(5-1) = 16 بخش فرعی

وقتی کارت‌ها به بخش‌های بالاتر منتقل می‌شوند، کمتر بازبینی می‌شوند.

حالت کارت

  • غیرفعال: کارت در کادر موجود است اما هنوز در حال بررسی فعال نیست.
  • فعال: کارت در یک بخش/فرعی است و در بررسی شرکت می کند.
  • بازنشسته: کارت سیستم کامل را تکمیل کرده است (فارغ التحصیل از بخش 5).

بررسی منطق

  • یک کارت وقتی به آخرین بخش بخش فعلی خود برسد سررسید میشود.
  • در طول بررسی:
    • درست -> به بخش بعدی، زیربخش 1 بروید.
    • اشتباه -> به بخش 1، بخش 1 بازنشانی کنید.
  • اگر به کارتی در بخش 5 پاسخ صحیح داده شود، بازنشسته می شود.

چرا این کار می کند

این فاصله مبتنی بر فرمول (2^(n-1)) با قوی‌تر شدن حافظه، فواصل زمانی را افزایش می‌دهد، در حالی که همچنان کارت‌های دشوار را به متداول‌ترین چرخه بازبینی برمی‌گرداند. در عمل، زمان بیشتری را روی کارت‌های ضعیف و زمان کمتری را روی کارت‌های تسلط می‌گذرانید.

نحوه وارد کردن فلش کارت به MyLeitnerBox

🎬 مقدمه

بله، می‌توانید فلش کارت‌های موجود خود را به MyLeitnerBox وارد کنید، خواه از Anki، Quizlet، یک فایل CSV/Excel، یا یک برنامه مطالعاتی دیگر باشند.

این راهنما جریان واردات کامل را شامل می‌شود، از جمله نحوه ایجاد یک کادر جدید یا افزودن کارت‌ها به جعبه‌ای که از قبل دارید.

1. منوی واردات 

را باز کنید

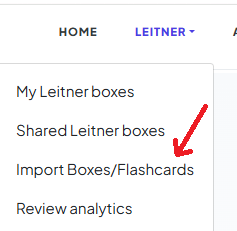
در منوی اصلی، روی “Leitner” کلیک کنید.
سپس “Import Boxes/Flashcards” را انتخاب کنید.

2. واردات منبع 

را انتخاب کنید

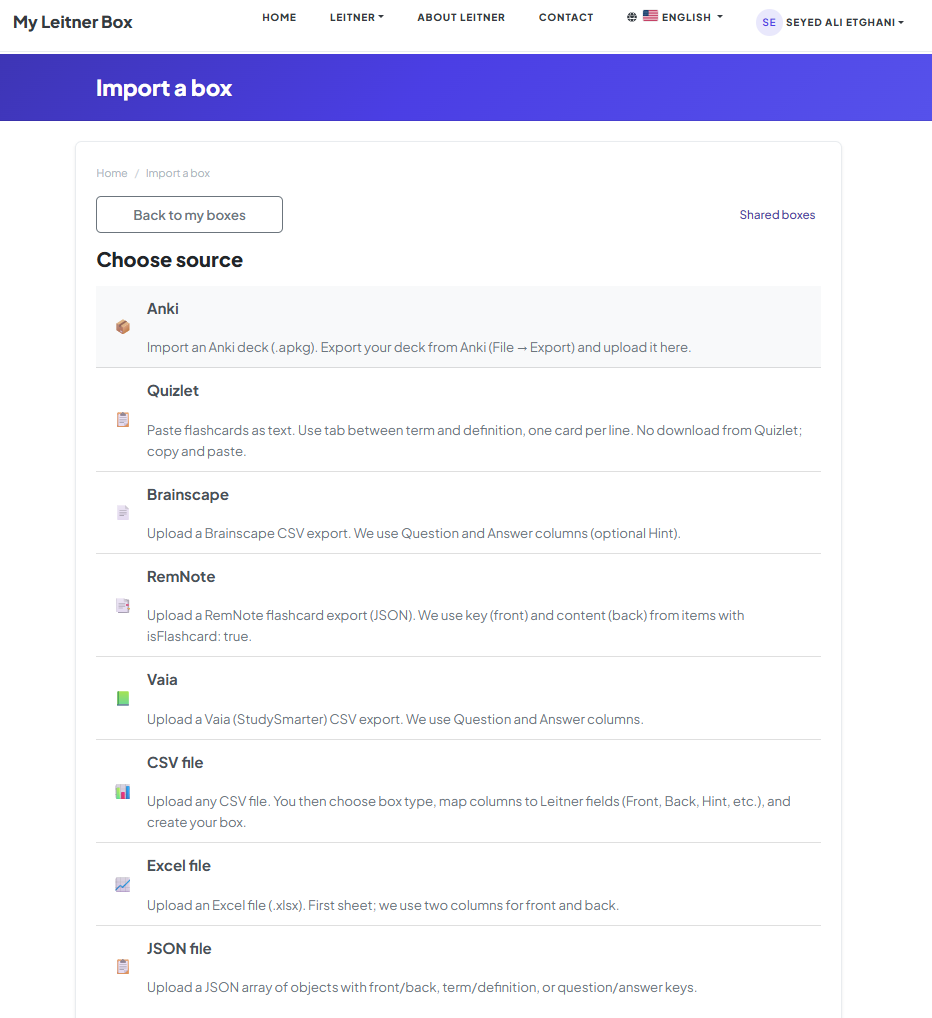
به صفحه “وارد کردن جعبه” هدایت خواهید شد.

<جدول> منبع آنچه ارائه می کنید

آنکی

یک فایل عرشه .apkg  (حداکثر 30 مگابایت)

Quizlet

متن چسبانده شده یا یک فایل .txt  (برگه بین عبارت و تعریف)

فایل CSV

هر صفحه گسترده .csv — سپس ستون ها را نقشه برداری کنید

فایل اکسل

پرونده .xlsx (برگ اول)

فایل JSON

آرایه JSON از اشیاء

متن ساختاریافته

بلوک‌های FRONT/BACK با ---

جدا شده‌اند

Brainscape

Brainscape CSV (سوال/پاسخ)

RemNote

RemNote JSON (isFlashcard: true items)

وایا

Vaia/StudySmarter CSV (سوال/پاسخ)


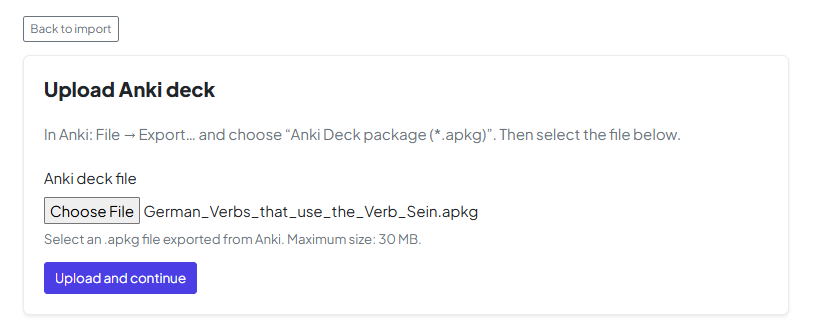
در این مثال، ما یک عرشه Anki وارد می‌کنیم.

3. فایل خود را آپلود کنید 

فایل فلش کارت خود را با استفاده از گزینه آپلود فایل آپلود کنید.

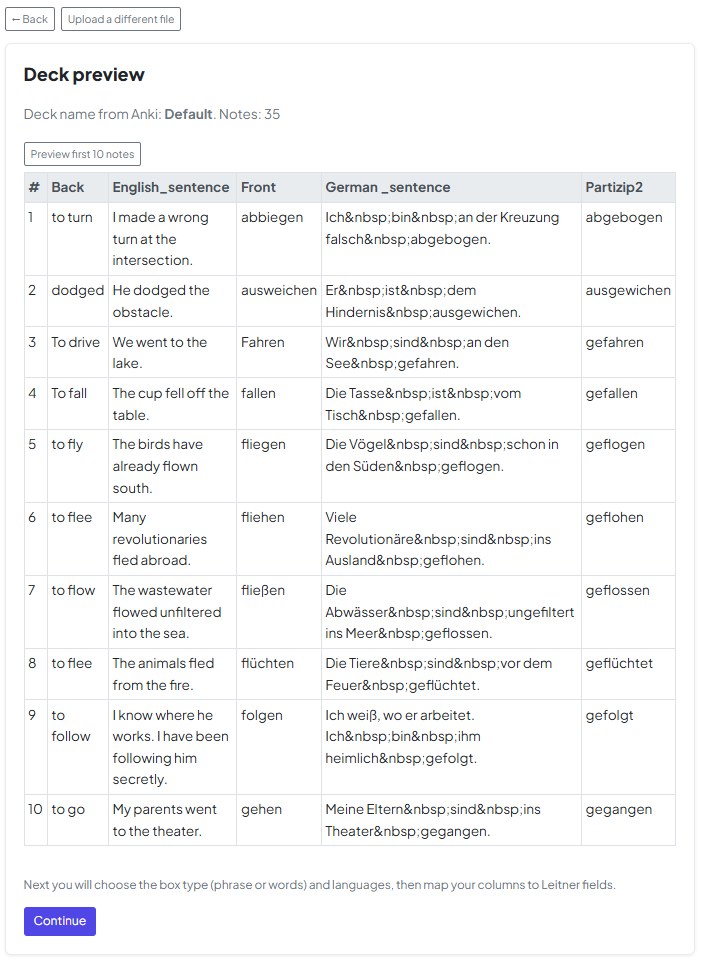
4. پیش نمایش داده های شما

پس از آپلود، پیش نمایش داده های خود را مشاهده خواهید کرد.
این مرحله به شما امکان می دهد تأیید کنید که محتوا به درستی وارد شده است.

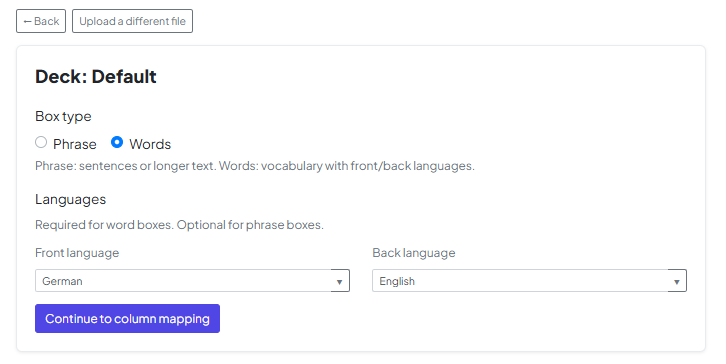
5. پیکربندی نوع کارت & زبان

انتخاب کنید که عرشه شما از "کلمات" (واژگان) یا "عبارات" (متن طولانی‌تر) تشکیل شده باشد. در این مرحله، همچنین باید زبان‌های Front و Back را تنظیم کنید تا مطمئن شوید ویژگی‌هایی مانند Text-to-Speech به درستی کار می‌کنند.

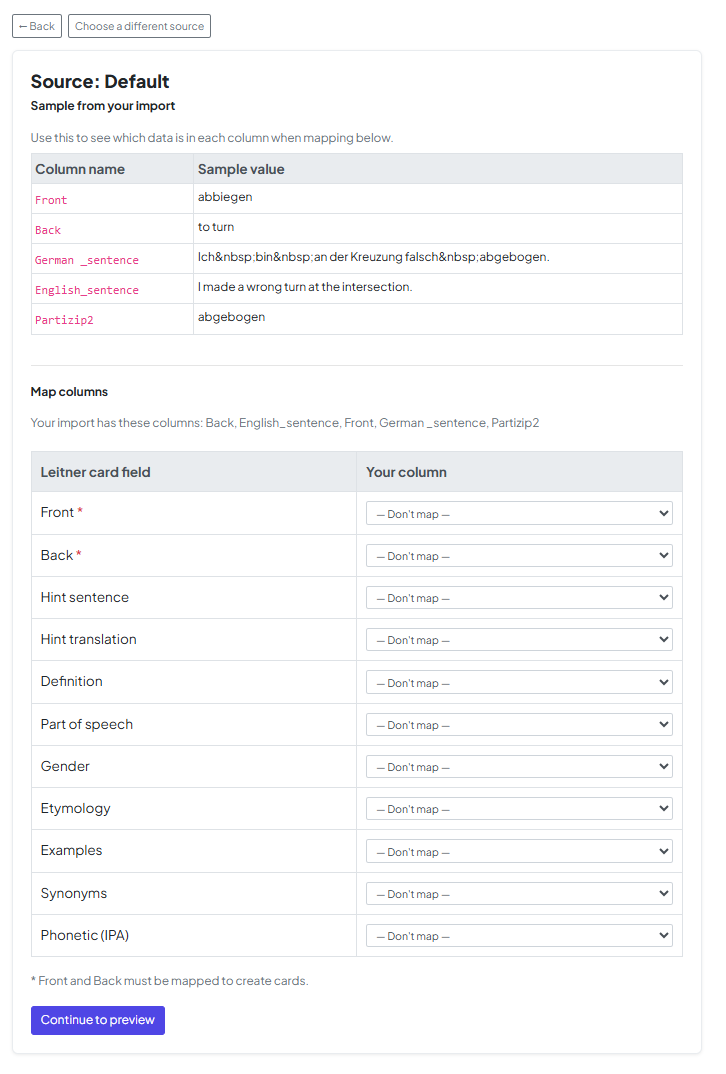
6. ستون های فلش کارت نقشه

اکنون، داده های فایل خود را با فیلدهای MyLeitnerBox تراز کنید. می‌توانید ستون‌های فایل خود را به فیلدهای خاصی مانند جلو، پشت، نکته یا تعریف نگاشت کنید.

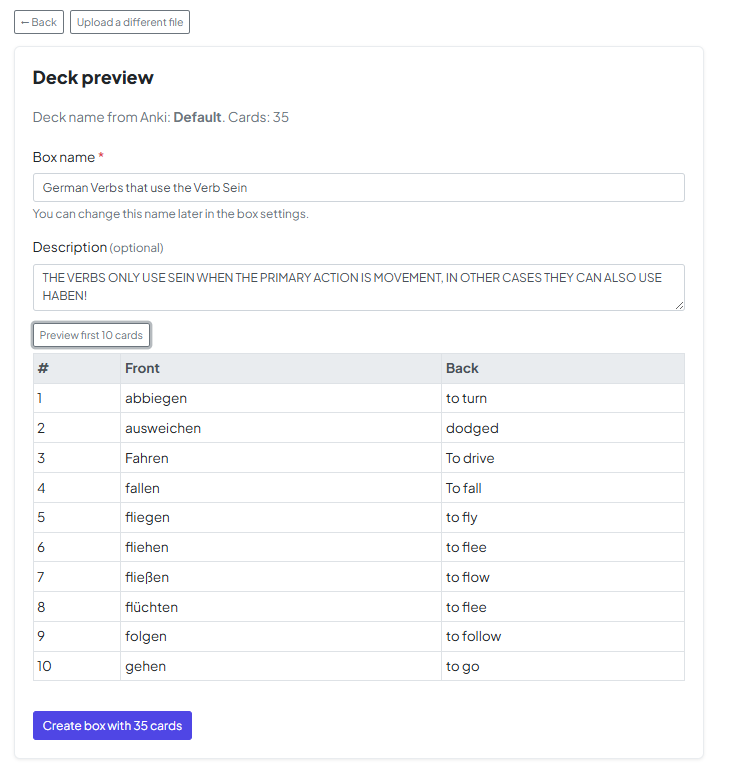
7. جعبه خود را نامگذاری کنید 

یک نام انتخاب کنید و به صورت اختیاری یک توضیح برای کادر جدید خود اضافه کنید.

8. فلش کارت های خود را فعال کنید 

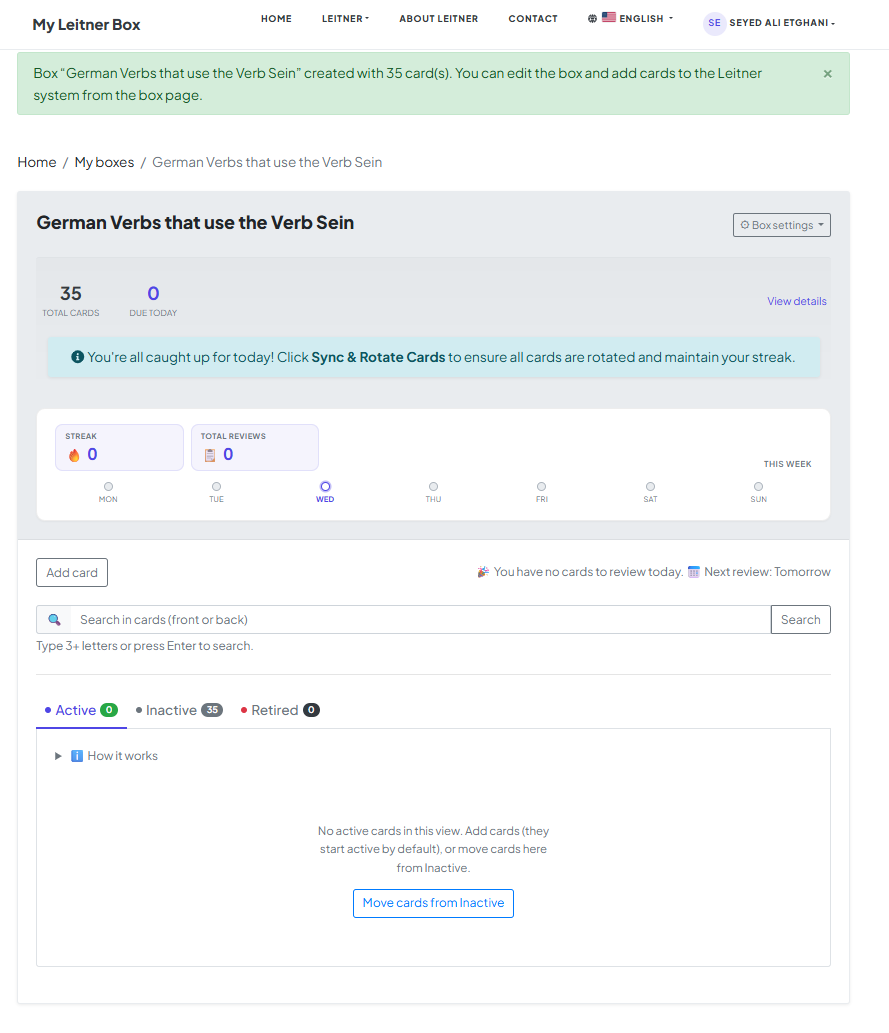
🎉 جعبه شما ایجاد شده است!

به طور پیش‌فرض، همه فلش کارت‌های وارد شده در حالت صف قرار دارند.

برای شروع استفاده از آنها:

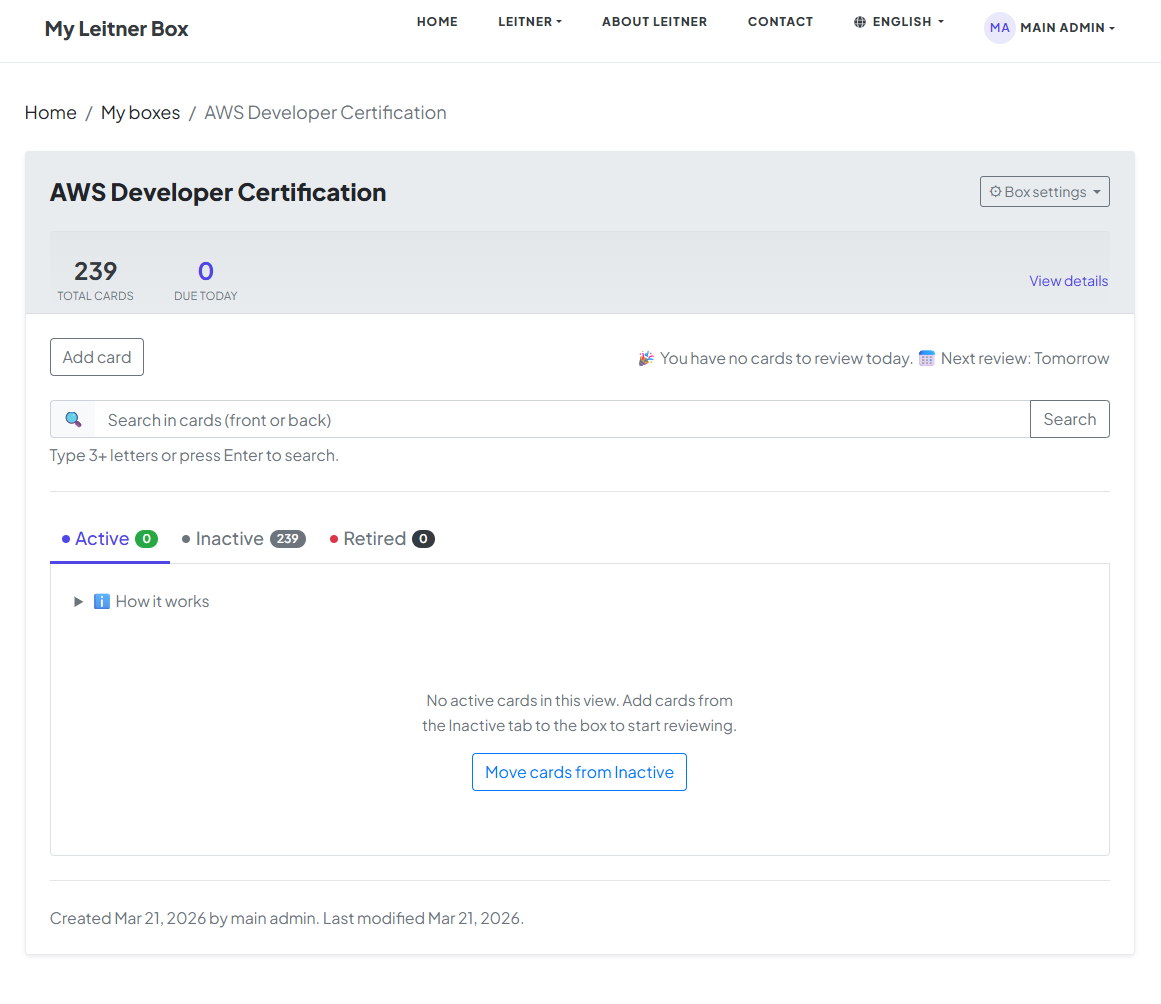
  • روی “انتقال کارتها از صف بندی شده”
  • کلیک کنید
  • تعداد کارتی را که می خواهید فعال کنید انتخاب کنید

9. شروع به یادگیری کنید

همین است! فلش کارت های شما اکنون آماده است.

می توانید جلسه مرور خود را شروع کنید و شروع به یادگیری کنید.


یادگیری مبارک! 😊

Mastery Check Guide


What Mastery Check is

Mastery Check lets users test cards that have already reached Mastered status (shown in the UI under the Retired tab).

It is not the same as normal daily review:

Mode Purpose Which cards Status while answering

Normal review

Learn / progress active cards

Active due cards

Changes Leitner status immediately

Practice

Extra practice sandbox

Cards in the box

Does not promote through Leitner

Mastery Check

Check long-term retention of graduated cards

Mastered / Retired only

No change until the user applies decisions at the end

Short definition for assistants:

Mastery Check = a front/back self-test on mastered cards. Results are informational until the user chooses Keep mastered, Move to queue, or Reactivate.


When Mastery Check is available

Mastery Check is available when:

  1. The user can manage the box.
  2. The box has at least one mastered (Retired) card.

If there are no mastered cards, the feature is not offered.


How users find it

  1. Open a box.
  2. Look at the card tabs: Active, Queued, Retired.
  3. If mastered cards exist (Retired count > 0):
    • The Retired tab shows a blue-tinted count badge.
    • A clipboard-check icon appears next to Retired (or a play icon if a Mastery Check is already in progress).
    • Hovering the tab shows a tooltip such as: “N mastered cards ready for a Mastery Check”.
  4. Click Retired.
  5. At the top of the Retired tab, a compact banner offers Mastery Check (or Continue Mastery Check if a session is open).

Assistants should guide users to: Box → Retired tab → Mastery Check.

Do not tell users to start Mastery Check from Start review. That starts normal review.


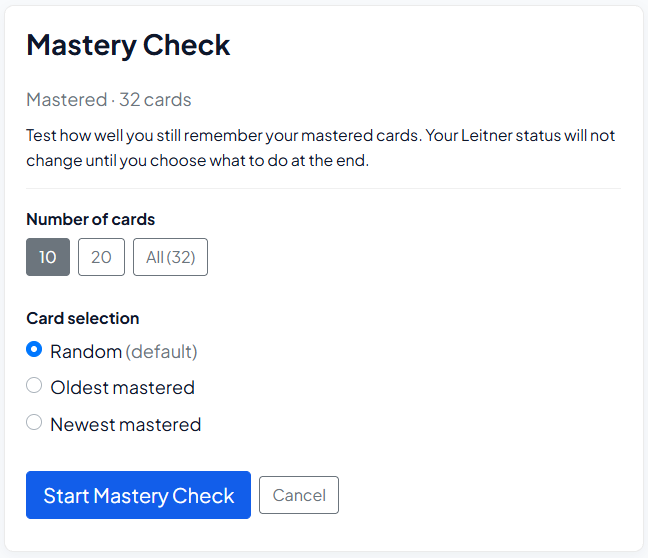
Setup (choose flashcards)

Purpose: Configure how many mastered cards to test and how to pick them.

Typical UI content:

  • Title: Mastery Check
  • Subtitle with mastered count, e.g. “Mastered · 32 cards”
  • Short explanation that Leitner status will not change until the end

Number of cards

Options are capped by how many mastered cards exist.

Examples:

  • If the box has 32 mastered cards, the user may see: 10, 20, All (32)
  • 50 is hidden when fewer than 50 mastered cards exist
  • If fewer than 10 exist, only All (N) may appear

The selected number never requests more cards than are available.

Card selection

  • Random (default)
  • Oldest mastered — longest since becoming mastered
  • Newest mastered — most recently mastered
  • By tag — only shown if mastered cards have tags; user can pick one or more tags

Primary actions

  • Start Mastery Check — begins the session
  • Cancel — returns to the box Retired tab

Assistant tip: If a user asks “how many should I choose?”, suggest starting with 10 or 20 for a short check, or All for a full sweep when they have time.


Review process (front/back)

Purpose: Test each selected mastered card with the familiar flip interaction.

How it works:

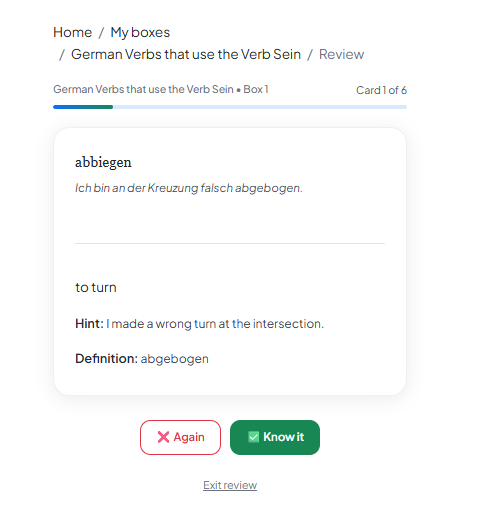
  1. Show the front of the card.
  2. User taps/clicks to reveal the back.
  3. User answers with one of:
    • Remembered — they still know it
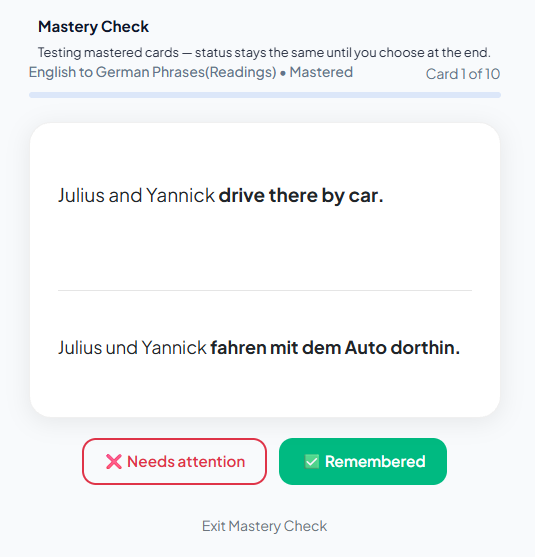
    • Needs attention — they do not feel solid on it
  4. Progress shows something like “Card X of Y”.
  5. Banner text clarifies: status stays the same until the end.
  6. User may Exit Mastery Check to abandon without applying changes.

Critical rule for assistants:

A “Needs attention” answer during Mastery Check does not automatically reactivate the card. Nothing moves until the completion screen.

Do not tell users that answering incorrectly will demote the card immediately. That is normal review behavior, not Mastery Check.


Completion form (results and decisions)

Purpose: Summarize the session and let the user decide what happens to cards that need attention.

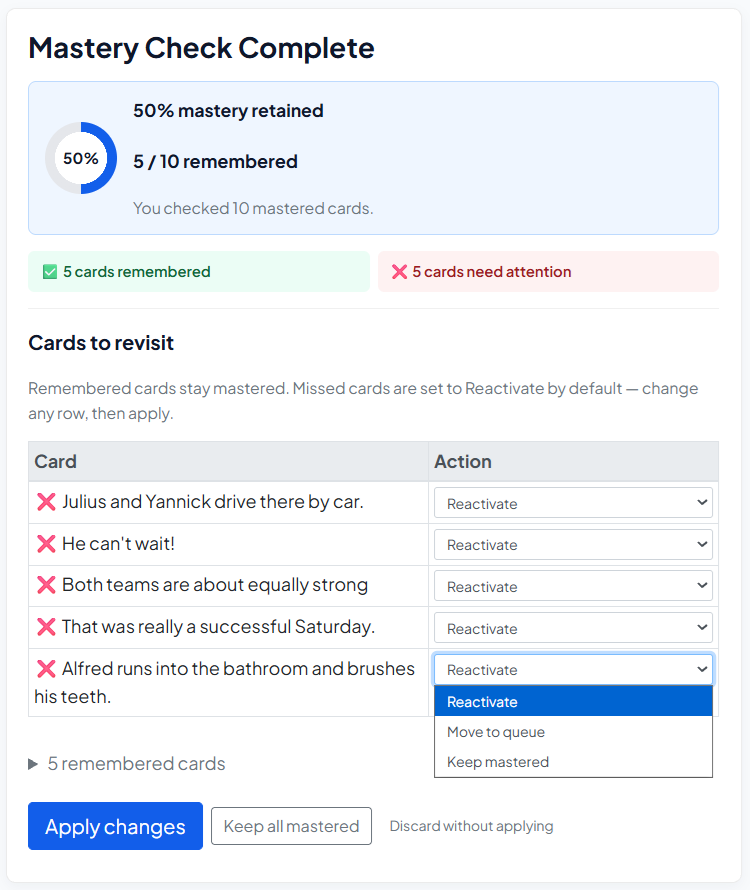
Typical summary:

  • Retention score, e.g. 70% mastery retained
  • Fraction remembered, e.g. 7 / 10 remembered
  • Counts for remembered vs needs attention

Cards to revisit

For cards marked Needs attention, the user sees a table:

Column Meaning

Card

The flashcard (usually front text)

Action

What to do with that card

Available actions per card:

  1. Reactivate — move back into the active Leitner cycle (typically starts again in Section 1).
    • Default for missed cards (pre-selected).
  2. Move to queue — move to Queued / inactive waiting list.
  3. Keep mastered — leave the card Mastered/Retired unchanged.

Remembered cards stay mastered by default and do not need a decision.

Final buttons

  • Apply changes (primary) — applies the chosen actions, then returns to the box
  • Keep all mastered — sets all revisit actions to Keep mastered, then applies
  • Discard without applying — ends the session with no status changes

Assistant tip: If the user is unsure, recommend leaving the default (Reactivate) for missed cards and pressing Apply changes. If they only wanted information and do not want to disturb their Leitner lineup, recommend Keep all mastered.


Recommended user workflow

  1. Open the box.
  2. Go to Retired.
  3. Click Mastery Check.
  4. Choose count (e.g. 10) and selection (Random is fine).
  5. Start and answer Remembered / Needs attention.
  6. On the results screen, review missed cards.
  7. Keep defaults or adjust actions.
  8. Click Apply changes.

Common user questions (for AI answers)

Q: Why don’t I see Mastery Check?
A: You need mastered/retired cards in that box. If Retired is 0, graduate cards through normal review first (complete Section 5), or move cards to retired if the box allows that.

Q: Does Mastery Check replace daily review?
A: No. Use normal review for active learning. Use Mastery Check occasionally to verify long-term retention of mastered cards.

Q: I marked a card “Needs attention”. Is it already reactivated?
A: Not yet. Finish the session and apply an action, or discard to leave everything mastered.

Q: What’s the difference between Move to queue and Reactivate?
A:

  • Reactivate = put the card back into active study (Leitner cycle).
  • Move to queue = put it in the queued/inactive waiting list.
  • Keep mastered = no change.

Q: Can I stop in the middle?
A: Yes. Use Exit Mastery Check. No status changes are applied.


Language and tone for assistants

Prefer:

  • Remembered
  • Needs attention
  • Keep mastered
  • Move to queue
  • Reactivate

Avoid:

  • Failed / failure
  • You forgot
  • Harsh exam language

Screenshot mapping

When screenshots are attached to this guide, map them as:

  1. Setup screenshot → Screen 1: number of cards + selection options + Start Mastery Check
  2. Review screenshot → Screen 2: front/back card with Remembered / Needs attention
  3. Completion screenshot → Screen 3: retention summary + Cards to revisit + Apply changes

Assistants describing the UI should refer to those three stages in that order.


One-sentence summary

Mastery Check is an optional self-test for mastered (Retired) cards that collects Remembered / Needs attention results and only changes card status when the user applies Keep mastered, Move to queue, or Reactivate at the end.

شروع کار با My Leitner Box، قسمت 1: جعبه خود را بسازید

MyLeitnerBox حول جعبه‌ها ساخته شده است: هر کادر محفظه‌ای برای فلش کارت‌ها درباره یک موضوع است که می‌خواهید با روش لایتنر به آن مسلط شوید. جعبه خود را نامگذاری کنید تا مشخص شود که بعداً برای چه چیزی است (به عنوان مثال، “افعال اسپانیایی — A2” یا “زیست شناسی — تقسیم سلولی”).

چگونه شروع کنیم

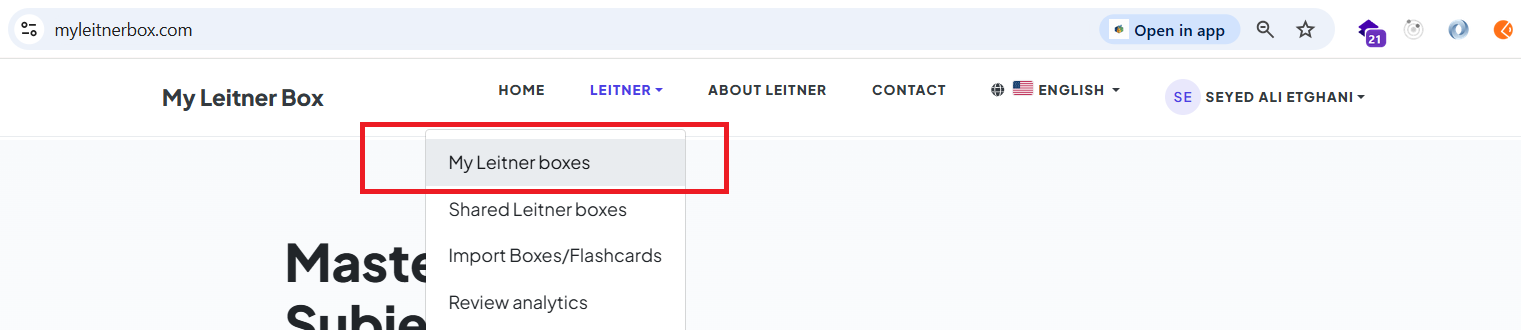
ابتدا، منوی اصلی را باز کنید و به صفحه جعبه‌ها بروید:

از طرف دیگر، می‌توانید مستقیماً به این آدرس بروید: https://www.myleitnerbox.com/leitner/

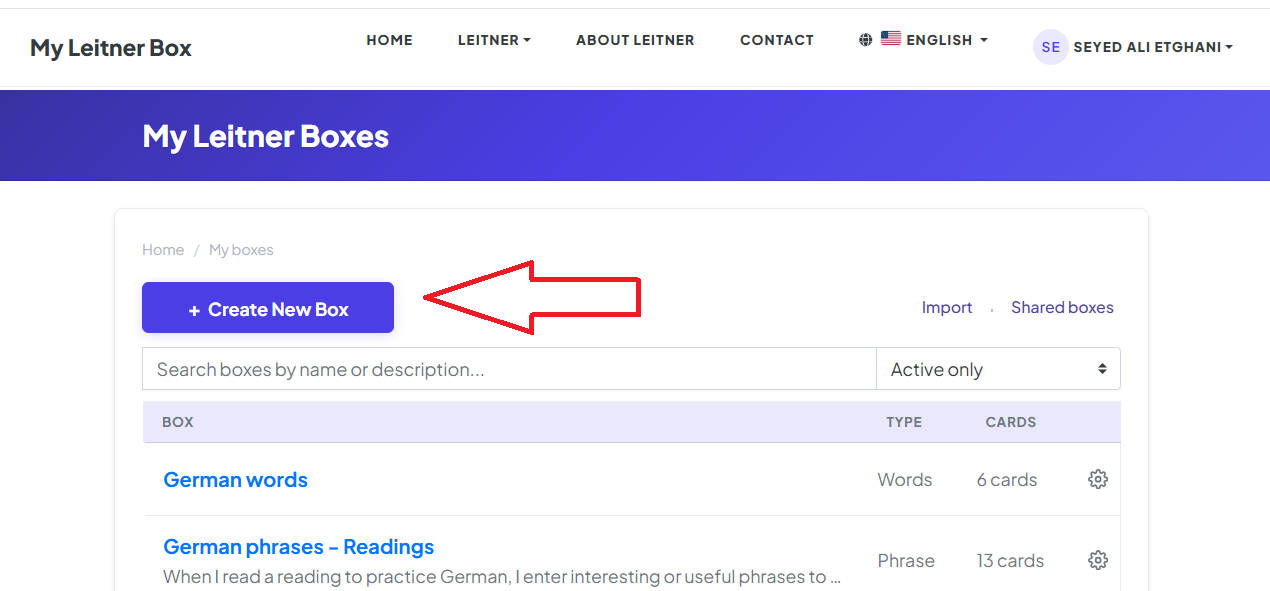
در این صفحه، روی دکمه "ایجاد جعبه جدید" کلیک کنید:

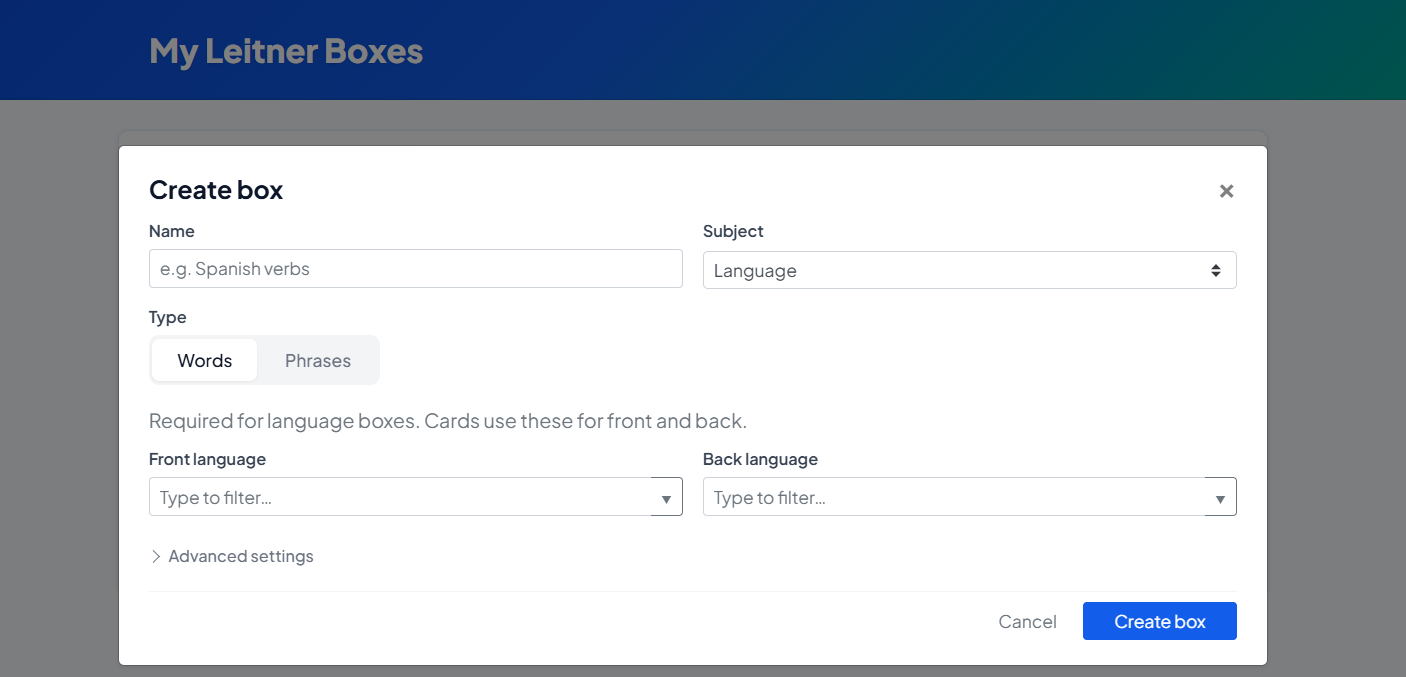
پس از کلیک کردن، مدال ایجاد کادر ظاهر می‌شود:

دسته ها (نوع موضوع)

بسته به چیزی که یاد می‌گیرید، می‌توانید از دسته‌های مختلف انتخاب کنید. این انتخاب بعداً روی گزینه‌ها تأثیر می‌گذارد (مخصوصاً برای تنظیمات مربوط به زبان).

اگر زبان را انتخاب کنید:

  • نوع کادر (عبارات یا کلمات): عبارت: برای جملات کامل و درخواست‌های طولانی‌تر بهتر است.

    • کلمات: برای کارت‌های به سبک واژگان بهتر است.

  • زبان‌های جلویی و پشتی: برای کادرهای کلمه، تعیین زبان‌های جلویی و پشتی ضروری است.

    • برای کادرهای عبارت، اختیاری است اما توصیه می‌شود بنابراین مرتب‌سازی، نکات و گزارش‌های آینده معنادار باقی می‌مانند.

اگر “دیگر” به عنوان موضوع:

  • برچسب موضوع: یک برچسب واضح وارد کنید (به عنوان مثال، “آکوردهای پیانو” یا “پرستاری — داروشناسی”). این به شما کمک می‌کند تا سازماندهی شده بمانید و گزارش‌ها و فیلترهای خود را با افزودن کادرهای بیشتر مفید نگه می‌دارد.

توضیحات (اختیاری)

یک فیلد توضیحات کوتاه وجود دارد که در آن می توانید توضیح دهید که این جعبه در مورد چیست. اختیاری است، اما زمانی که کادرهای زیادی دارید یا می‌خواهید زمینه را با "خود آینده‌تان""

به اشتراک بگذارید، کمک می‌کند.

بعدی چیست؟

جعبه شما اکنون آماده است و منتظر است! گام بعدی پر کردن آن با دانش است.

برای یادگیری نحوه انجام، قسمت بعدی راهنمای ما را بررسی کنید: [شروع به کار با My Leitner Box، قسمت 2: افزودن فلش کارت]

شروع با My Leitner Box، قسمت 2: اضافه کردن فلش کارت

بعد از اینکه یک کادر ایجاد کردید، گام بعدی پر کردن آن با دانش است. نوع کارتی که ایجاد می‌کنید بستگی به دسته جعبهی دارد که در طول راه‌اندازی انتخاب کرده‌اید.

این راهنما سه نوع اصلی فلش کارت و نحوه استفاده حداکثری از آنها را پوشش می دهد.


چگونه کارت ها به جعبه شما متصل می شوند

از هر نوع که استفاده می‌کنید، کارت‌های جدید مستقیماً به جعبه شما اضافه می‌شوند و جریان کاری لایتنر خود را وارد می‌کنند. آنها بر اساس برنامه زمانی شما و میزان به خاطر سپردن آنها در جلسات بررسی شما ظاهر می شوند.


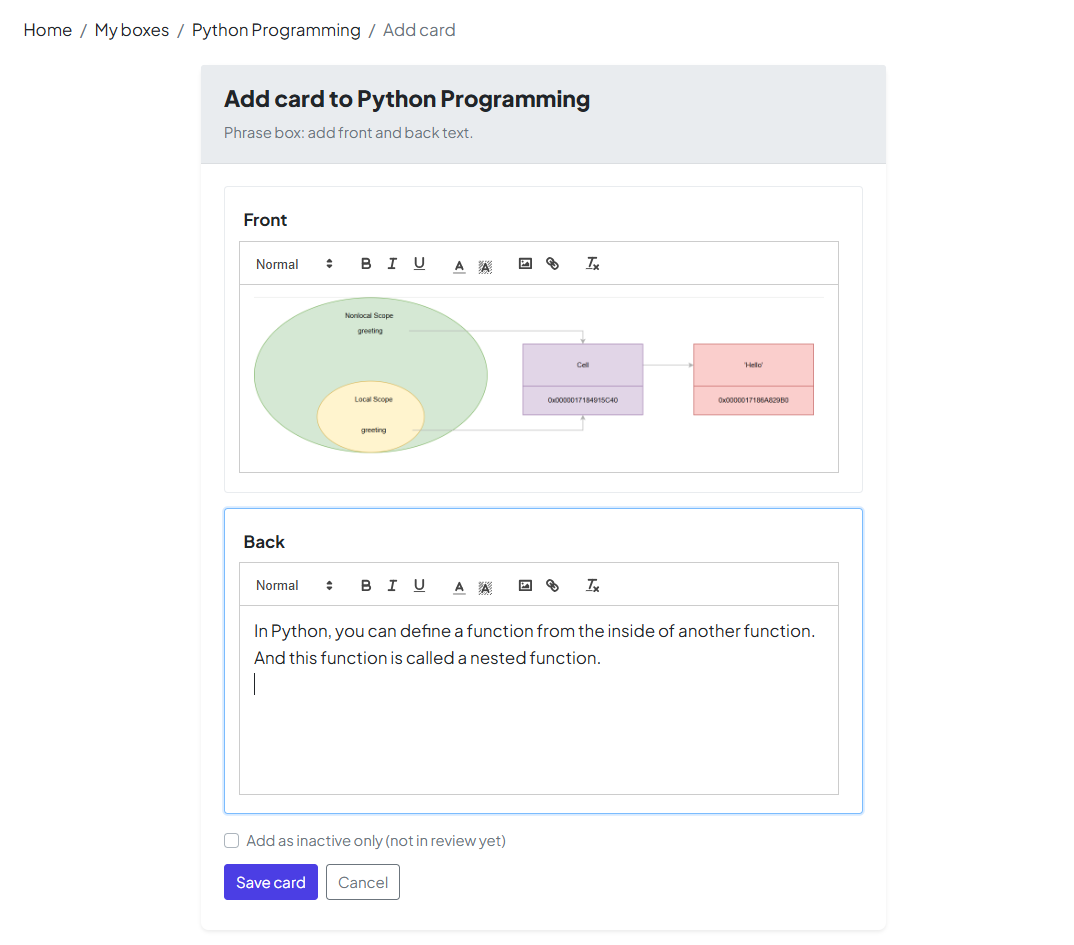
1. عبارات عادی (موضوعات عمومی)

بهترین برای: تاریخچه، علم، یا هر موضوعی که می‌خواهید یک راه‌اندازی ساده جلو/پشت بدون ابزارهای خاص زبان را داشته باشید.

  • متن غنی: از ویرایشگر داخلی برای پررنگ کردن عبارت‌های کلیدی یا ایجاد فهرست‌ها استفاده کنید.

  • تصاویر: عکس‌ها یا نمودارها را برای نشان دادن ایده‌ها در زمانی که متن کافی نیست آپلود کنید.

  • یادآوری: در بررسی، ابتدا جلو را می‌بینید و سعی می‌کنید پشت را به خاطر بسپارید.


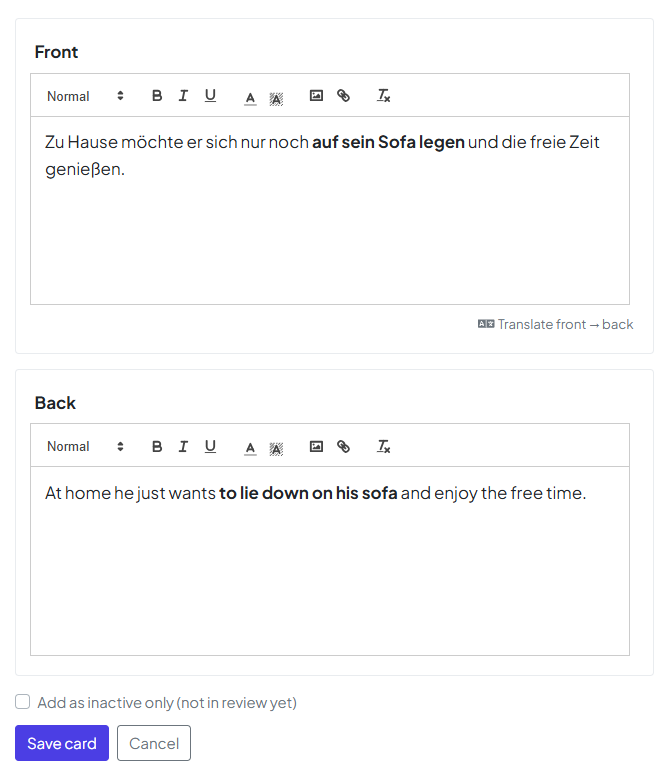
2. زبان — عبارات

بهترین برای: یادگیری در جملات کامل. این شامل همه چیز در "عبارات عادی» به علاوه ابزارهای آگاه به زبان.

  • ترجمه خودکار: به سرعت برای عبارات خود ترجمه ایجاد کنید.

  • تکست به گفتار (TTS): اگر زبان‌های خود را در حین ایجاد کادر تنظیم کنید، می‌توانید از صدای مبتنی بر هوش مصنوعی برای شنیدن تلفظ صحیح استفاده کنید.

  • توجه: اگر در حین تنظیم کادر از انتخاب زبان صرفنظر کرده اید، ممکن است این گزینه ها محدود باشند.


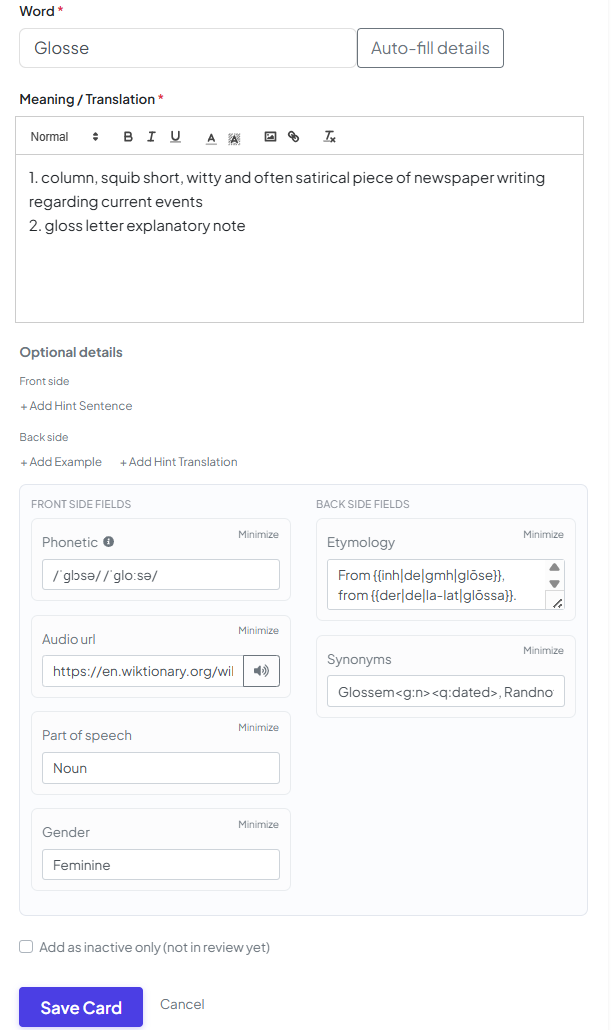
3. کلمات (واژگان)

بهترین برای: مطالعه عمیق واژگان. این کارت‌ها زمینه‌های بیشتری را نسبت به یک جلو/پشت ساده فراهم می‌کنند تا نمای 360 درجه یک کلمه را به شما ارائه دهند.

  • موضوع بیشتر: توصیه می‌کنیم تا جایی که ممکن است فیلدهای اختیاری را پر کنید—زمینه اضافی به خاطر سپردن کلمات را بسیار آسان‌تر می‌کند.

  • دستیار هوشمند: برای صرفه جویی در زمان، از دکمه پر کردن خودکار استفاده کنید. این برنامه اطلاعات ساختاریافته (تعریف، مثال‌ها و غیره) را از ویکی‌واژه می‌کشد، بنابراین لازم نیست همه چیز را با دست تایپ کنید.


کارت های جدید کجا می روند؟

پس از ذخیره، کارت‌ها معمولاً در بخش 1 شروع می‌شوند.

💡 نکته حرفه ای: خودتان را غرق نکنید! اگر 100 کارت را همزمان وارد کنید، بخش 1 می تواند به "توده عظیمی" تبدیل شود. که باعث می شود بررسی روزانه شما غیرممکن باشد. ابتدا برخی از کارت‌ها را به‌عنوان در صف علامت‌گذاری کنید، سپس با تسلط بر دسته فعلی، آنها را به تدریج فعال کنید.


بعدی چیست؟

اکنون ابزارهایی برای ساختن یک عرشه قدرتمند در اختیار دارید. قدم طبیعی بعدی این است که حافظه خود را آزمایش کنید!

→ [شروع با My Leitner Box، قسمت 3: اجرای یک جلسه بازبینی]

شروع کار با My Leitner Box، قسمت 3: یک جلسه بازبینی اجرا کنید

وقتی کارت‌ها را اضافه کردید، برای مهم‌ترین بخش آماده هستید: بازبینی. اینجا جایی است که بر اساس پیشرفت خود، فراخوان فعال را تمرین می‌کنید و کارت‌ها را از طریق بخش‌های لایتنر جابه‌جا می‌کنید.

1. جعبه خود را باز کنید & هدف امروز

را بررسی کنید

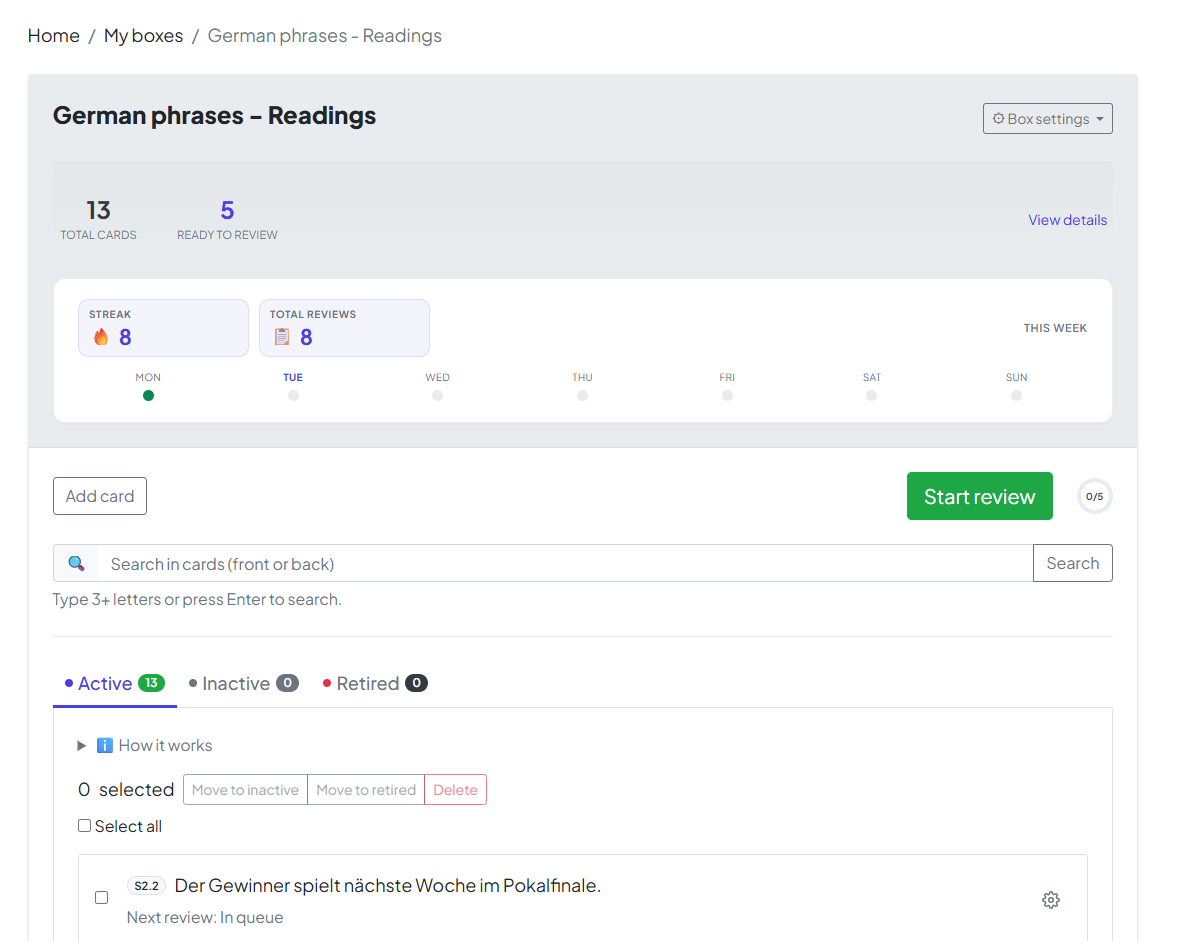
روی نام جعبه خود کلیک کنید تا داشبورد آن باز شود. در بالا، خلاصه خود را خواهید دید:

  • مجموع کارت‌ها: هر کارت در این کادر.

  • آماده برای بازبینی: تعداد کارت‌های سررسید امروز. اگر این بالاتر از صفر است، شما آماده شروع هستید!

2. جریان بررسی

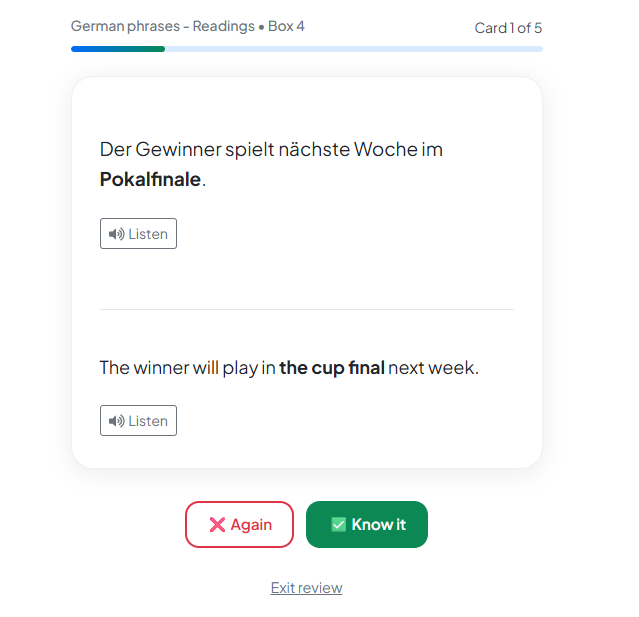
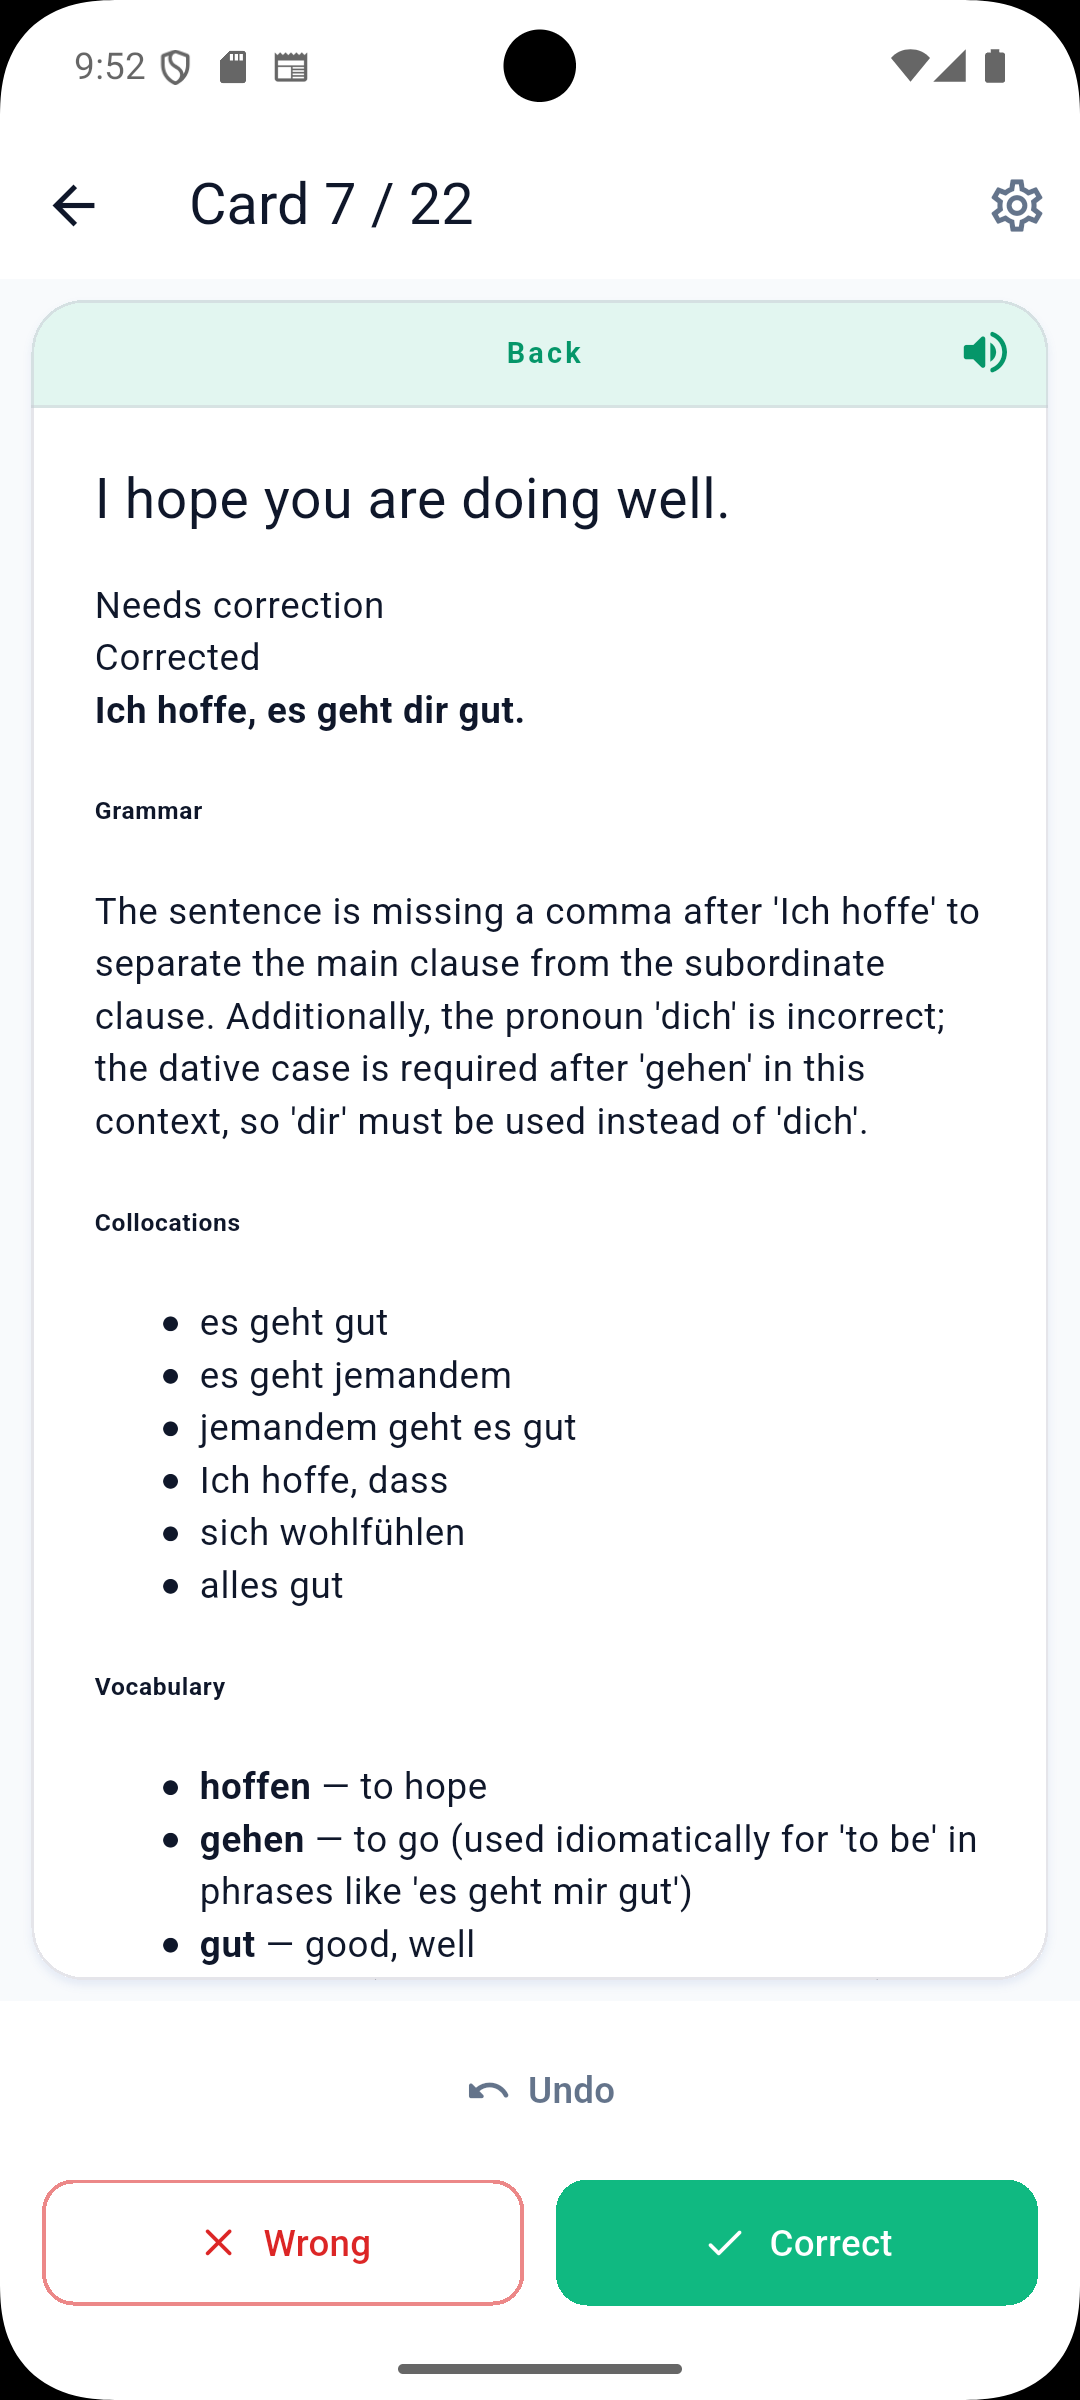
روی شروع بررسی کلیک کنید. برنامه ابتدا جلو کارت را به شما نشان می دهد. سعی کنید پاسخ را به خاطر بیاورید، سپس برای نمره دادن خود، پشت آن را آشکار کنید.

🔊 نکته حرفه ای: گوش دادن با هوش مصنوعی

برای کادرهای عبارت زبان، به دنبال دکمه گوش دادن بگردید. ما از هوش مصنوعی پیشرفته برای ارائه متن به گفتار در سطح بومی استفاده می‌کنیم که به شما کمک می‌کند در کنار حافظه، تلفظ را نیز تسلط دهید.

توجه: به همین دلیل است که تنظیم زبان شما در حین ایجاد جعبه بسیار مهم است—این به هوش مصنوعی ما می گوید که دقیقا چگونه عبارات شما را بیان کند! 


3. تکمیل جلسه

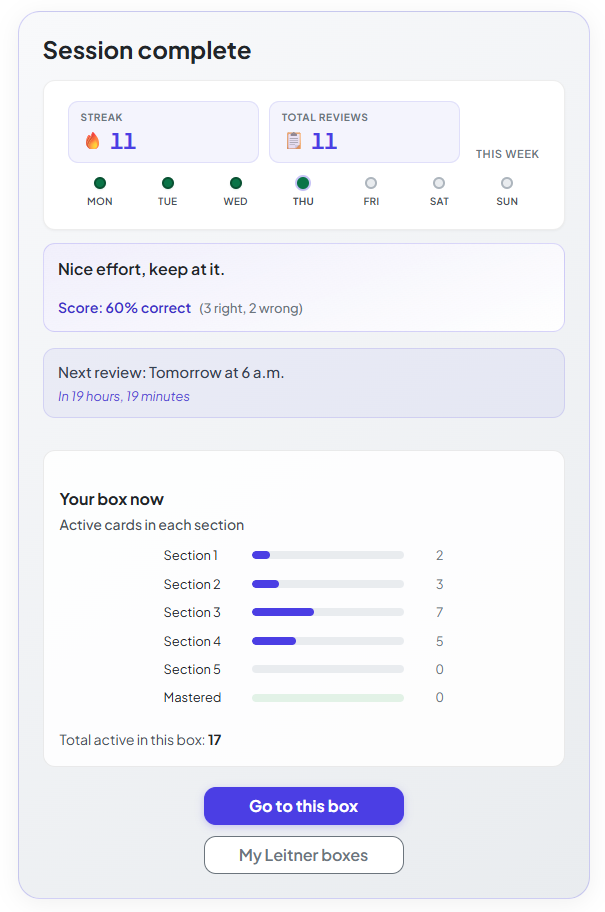
یک جلسه فقط زمانی تکمیل می‌شود که همه کارت‌های دسته فعلی را تمام کرده باشید. برای حفظ رگه‌ها و به‌روزرسانی آمار تکمیل خود، به اتمام کامل اجرا نیاز است.

4. «استراحت» دوره

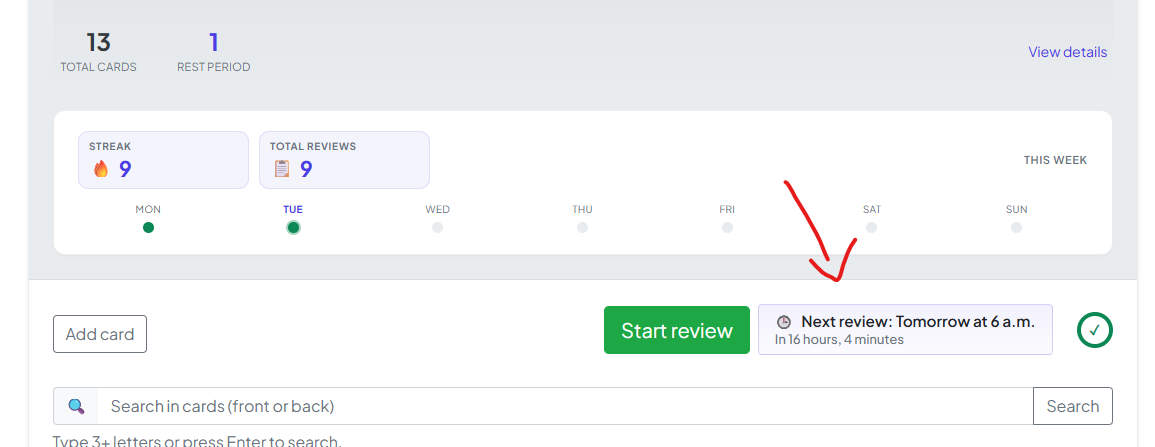
پس از اتمام، برنامه دوره استراحت کوتاه را اعمال می‌کند. تکرار فاصله زمانی بسیار موثر است که کارت های مشابه را در یک روز بیش از حد مطالعه نکنید. صفحه جعبه شما دقیقاً زمانی را نشان می دهد که جلسه بعدی شما در دسترس است.


شما آماده اید!

شما اکنون حلقه کامل را دارید: ایجاد → افزودن → مرور. با دنبال کردن این چرخه، مطمئن می‌شوید که آنچه امروز یاد می‌گیرید برای درازمدت با شما می‌ماند.

یادگیری مبارک—ما برای شما ریشه یابی می کنیم!

تسلط بر تجزیه و تحلیل مرور

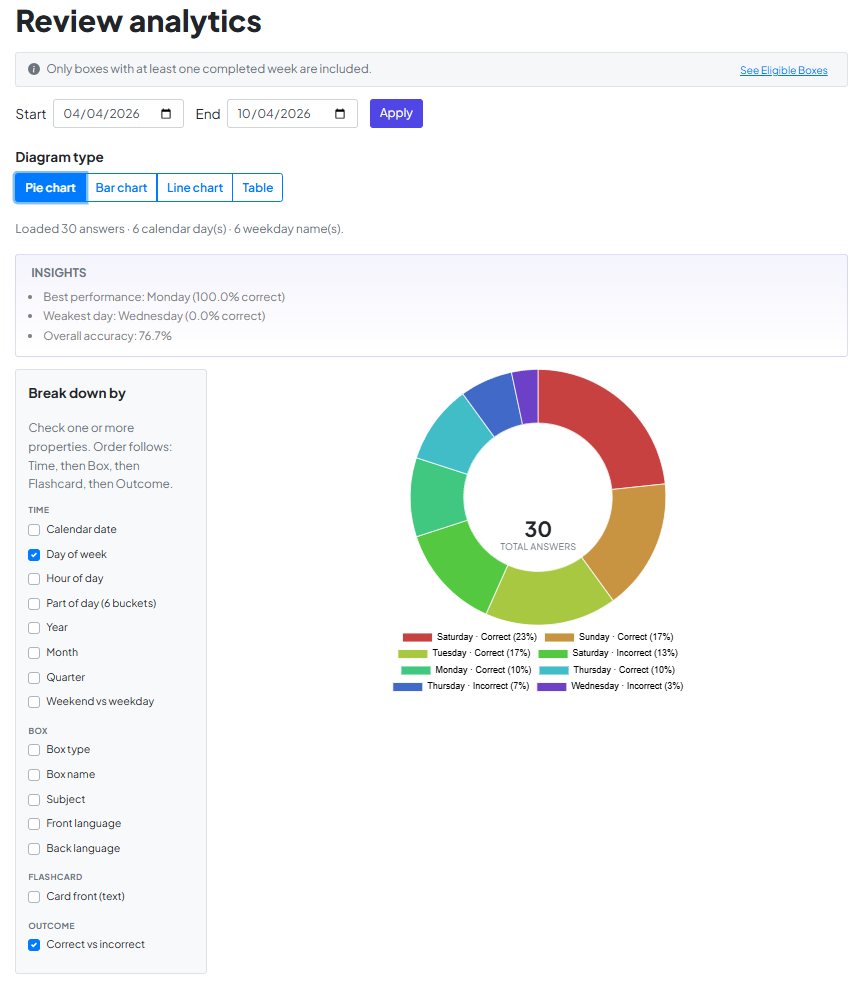
Review Analytics سابقه مطالعه شما را به یک نقشه راه شخصی تبدیل می کند. به جای حدس زدن، از داده های خود برای یافتن "ساعت طلایی» برای تمرکز و شناسایی دقیق جایی که نیاز به بهبود دارید.

1. نحوه باز کردن قفل

برای اطمینان از معنی‌دار بودن داده‌های شما، Analytics پس از ایجاد یک عادت ثابت باز می‌شود: یک هفته مرور کامل دوشنبه تا یکشنبه در حداقل یک کادر.

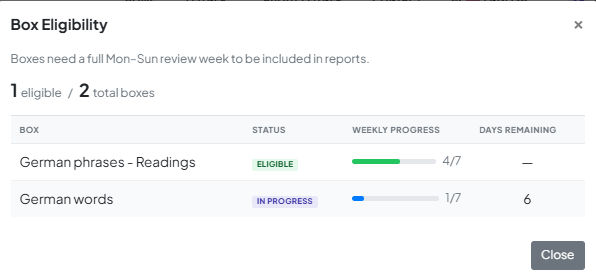
  • نوار اطلاعات: در بالای صفحه، این نوار وضعیت شما را ردیابی می کند. به شما می‌گوید برای باز کردن قفل چه چیزهایی لازم است یا کدام جعبه‌ها در حال حاضر گنجانده شده‌اند.

  • پانل واجد شرایط بودن: روی نوار اطلاعات کلیک کنید تا به تفکیک هر کادری که متعلق به خود هستید، مشاهده کنید. وضعیت آن (واجد شرایط، در حال انجام، یا در حال تعلیق) و شمارش معکوس بصری روزهای باقی‌مانده در مجموعه شما را نشان می‌دهد.


نکته: لازم نیست همه چیز را باز کنید. به محض اینکه یک جعبه آماده شد، وارد می شوید!

2. بینش خود را ایجاد کنید

پس از باز شدن قفل، داده‌های شما آماده برش و برش است.

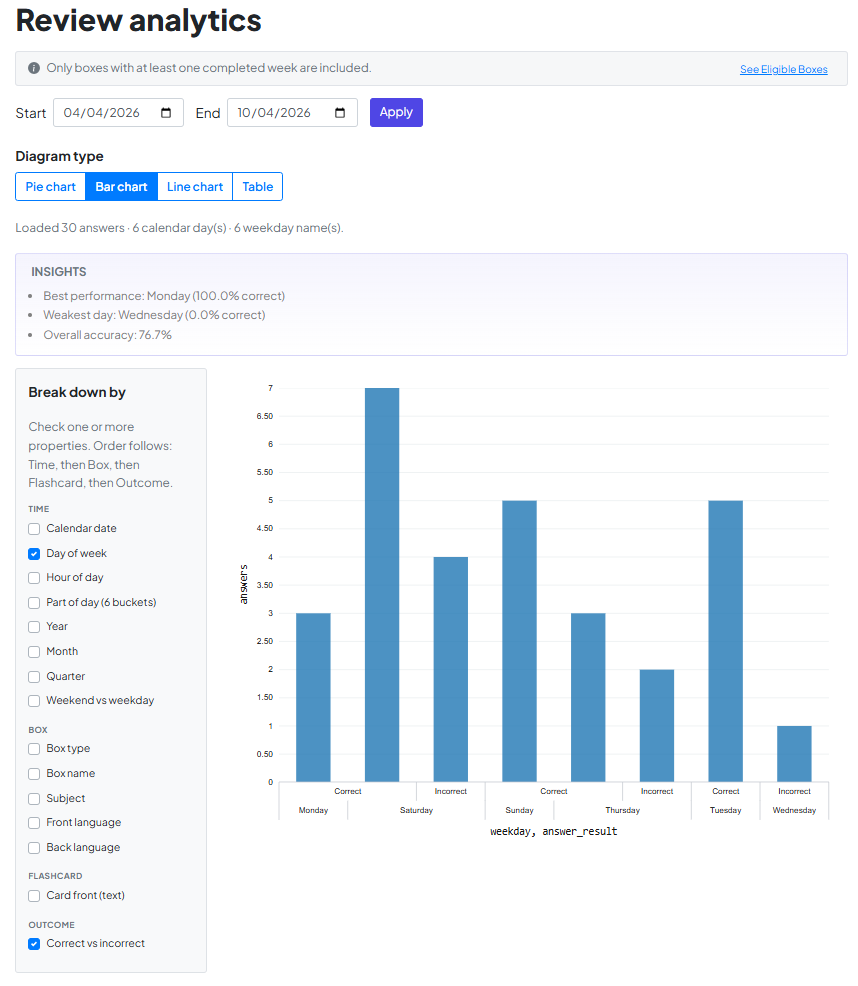
  1. محدوده را تنظیم کنید: تاریخ‌های شروع و پایان خود را انتخاب کنید و روی اعمال ضربه بزنید.

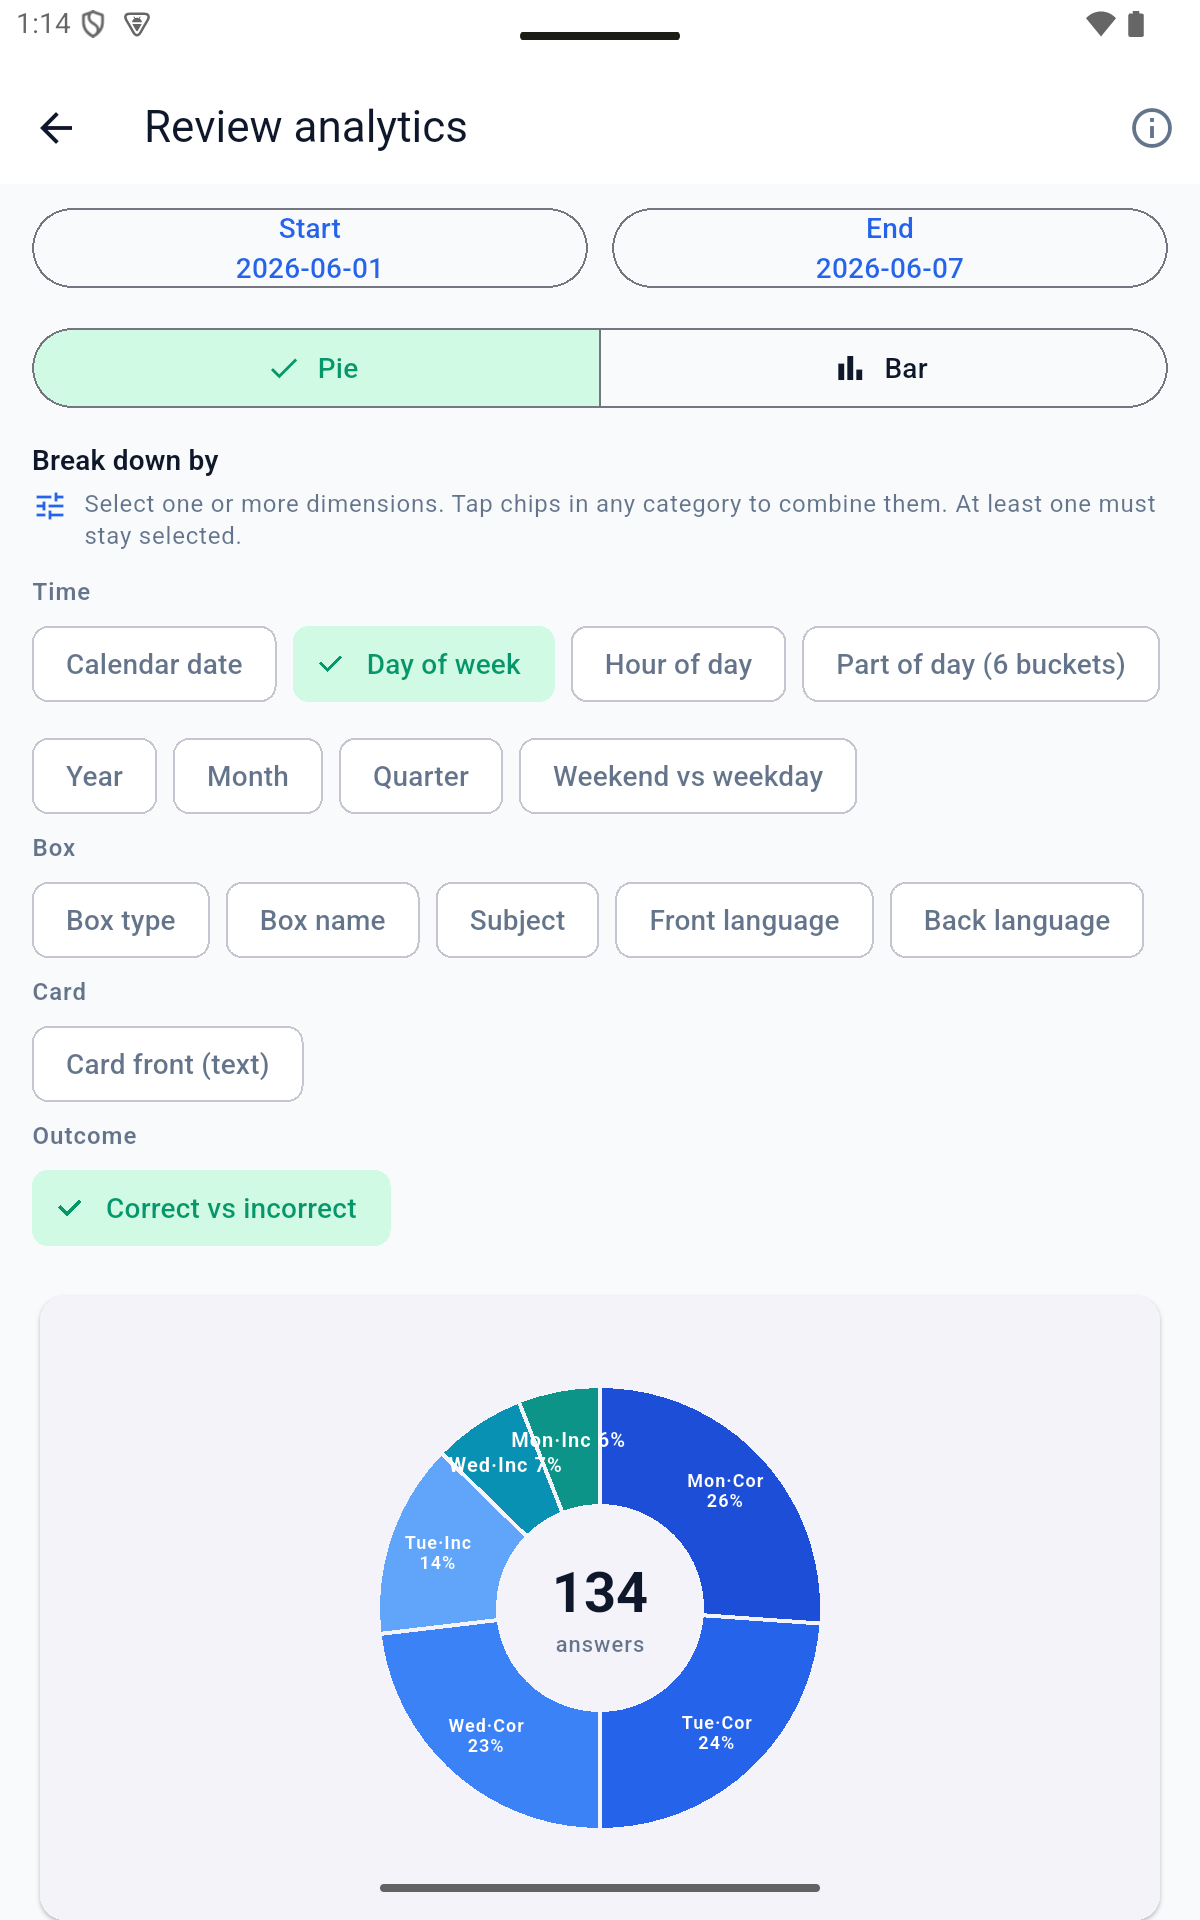
  2. تجزیه آن: از نوار کناری برای بررسی ویژگی‌هایی که می‌خواهید ببینید (مانند روز هفته یا نام جعبه) استفاده کنید. سیستم به طور خودکار اینها را لایه بندی می کند تا به شما نشان دهد که دقیقاً کجا برتر هستید.

  3. لنز خود را انتخاب کنید: بین نوارهای دایره‌ای، میله‌ای، خطی یا جدول جابه‌جا شوید تا پیشرفت خود را تجسم کنید.

3. خودکار «آها!» لحظات

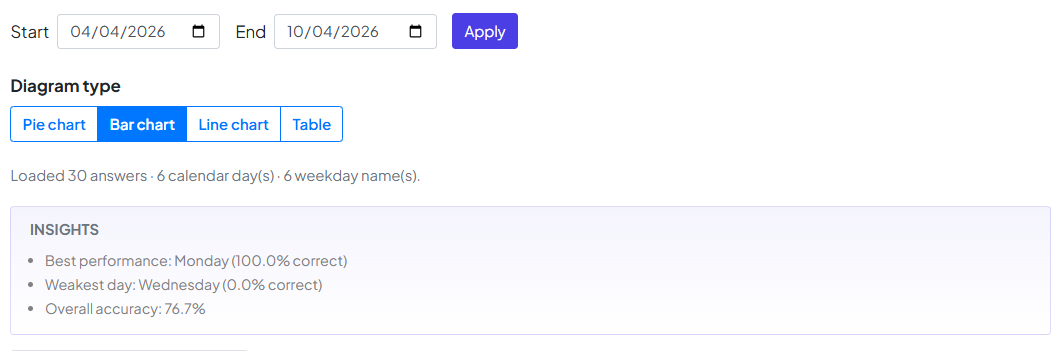
نمی‌خواهید اعداد را بررسی کنید؟ پانل Insights را بررسی کنید. به طور خودکار الگوهایی را برای شما علامت گذاری می کند، مانند:

  • بهترین عملکرد: در کدام روز از هفته به 100% رسیدید.

  • ضعیف ترین روز: زمانی که ممکن است به یک شات اسپرسو اضافی یا یک بار مطالعه سبک تر نیاز داشته باشید.

  • دقت کلی: میزان کل نگهداری شما در طول دوره انتخابی.


یک یادداشت نهایی از تیم

در پایان، این نمودارها چیزی فراتر از اعداد هستند—آنها بازتابی از فداکاری شما هستند. تجزیه و تحلیل مرور را ساختیم تا حدس و گمان را از پیشرفت شما حذف کنیم و به شما کمک کنیم هوشمندتر مطالعه کنید، نه بیشتر.

ما مفتخریم که بخشی از داستان یادگیری شما هستیم. تحصیل مبارک، و ما برای موفقیت شما ریشه دوانده ایم!

یک کادر مشترک به "جعبه های لایتنر من" خود اضافه کنید

وقتی برای اولین بار یک کادر عمومی به مجموعه خود اضافه می کنید، یک فایل را وارد می کنید یا یک کادر جدید از ابتدا ایجاد می کنید، همه کارت ها در حالت "در صف" شروع می شوند. این راهنما به شما نشان می دهد که چگونه کارت های خود را فعال کنید و سفر خود را به سمت تسلط طولانی مدت آغاز کنید.

منطق: برای پیشرفت مؤثر، باید کارت‌ها را به تدریج بر اساس ظرفیت خود فعال کنید. این کار مانع از غرق شدن شما می شود و جلسات مطالعه شما را متمرکز نگه می دارد.

📥 مرحله 1: شروع انتقال

در ابتدا، همه کارت‌های موجود در جعبه شما در حالت در صف قرار خواهند گرفت. شما دو راه برای وارد کردن آنها به چرخش مطالعه خود دارید:

  • میانبر: روی دکمه "انتقال کارتها از صف" در داشبورد خود کلیک کنید.

  • انتخاب دستی: مستقیماً به برگه در صف بروید و به صورت دستی وضعیت کارت‌های خاص را به "فعال"

    تغییر دهید.

در این راهنما، با کلیک بر روی دکمه "انتقال کارت‌ها از صف" اقدام می‌کنیم.

🔢 مرحله 2: انتخاب بار روزانه

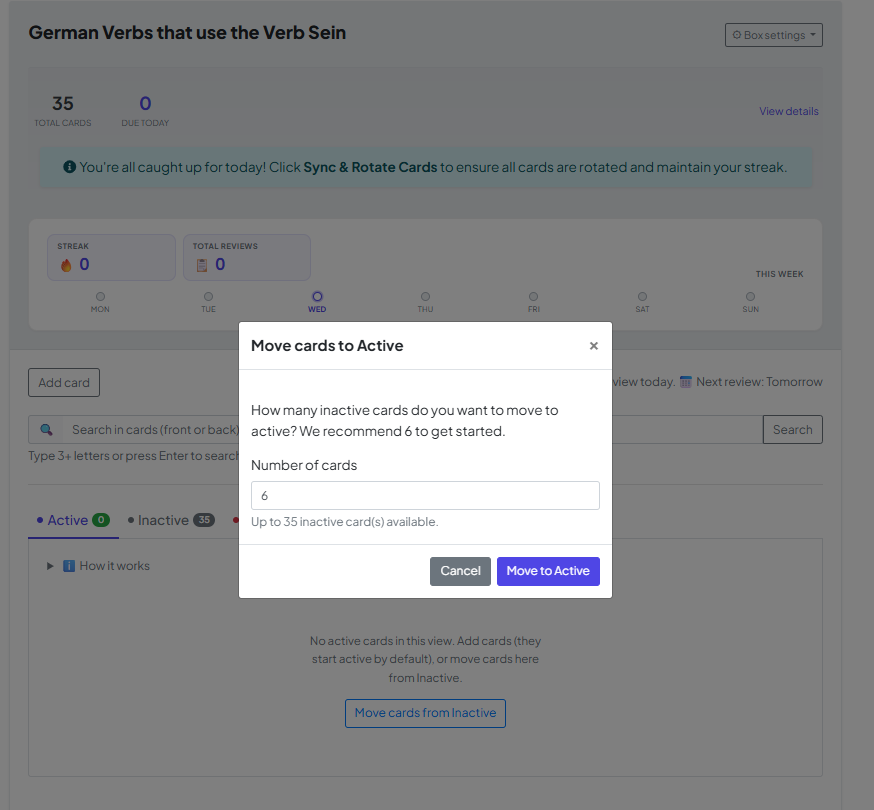
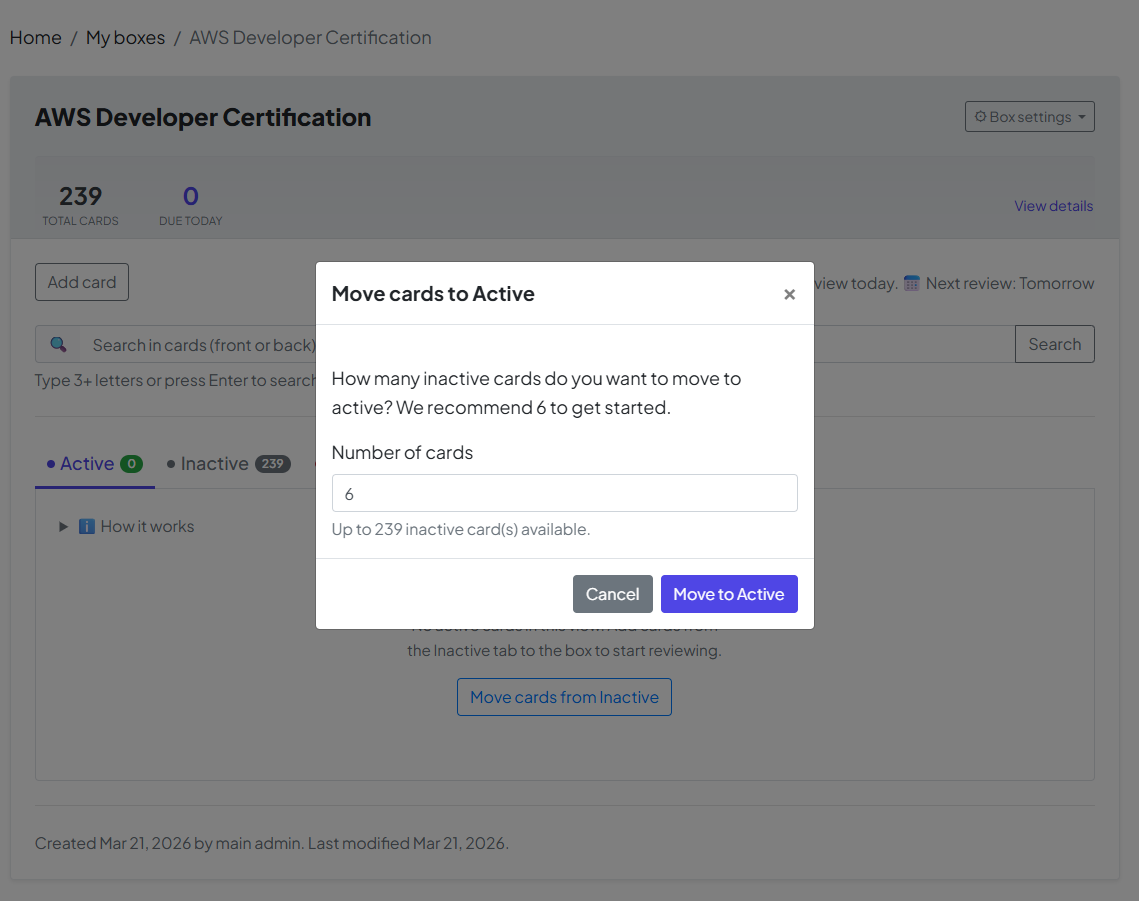
پس از کلیک بر روی دکمه، پنجره ای ظاهر می شود که تعداد کارت های پیش فرض را برای جابه جایی نشان می دهد.

  • پیش‌فرض: سیستم 6 کارت را به عنوان نقطه شروع پیشنهاد می‌کند.

  • انتخاب شما: اگر می‌خواهید امروز با کارت‌های بیشتر یا کمتری مقابله کنید، می‌توانید این شماره را تغییر دهید. پس از تنظیم شماره خود، برای تأیید روی "انتقال به فعال" کلیک کنید.

🏆 مرحله 3: ماموریت انجام شد — "بازنشسته» حالت

هدف نهایی جعبه شما انتقال هر کارت به حالت بازنشسته است. این لحظه تسلط است!

  • فرمول تسلط: یک کارت به "بازنشسته" وضعیت زمانی که به آن پاسخ صحیح داده اید 5 بار متوالی در فواصل زمانی خاص و افزایشی.

  • موفقیت بلند مدت: وقتی کارتی بازنشسته می شود، به این معنی است که اطلاعات با موفقیت از حافظه کوتاه مدت شما به حافظه بلند مدت دائمی شما منتقل شده است.

تبریک می‌گویم! هنگامی که همه کارت ها در حالت بازنشستگی قرار گرفتند، شما به طور رسمی این جعبه را فتح کرده اید. شما فهرستی از حقایق را به دانشی تبدیل کرده‌اید که برای یک عمر نگه دارید.

How to Manage Cards on Your Box Page

Yes — on every box page in MyLeitnerBox, you can search, sort, filter, activate, retire, reverse, tag, move, and delete flashcards without leaving that box.

This guide answers the most common questions about the buttons, tabs, and tools at the top of your flashcard list.

Open a box first: go to Boxes → My Boxes, then click the box name.
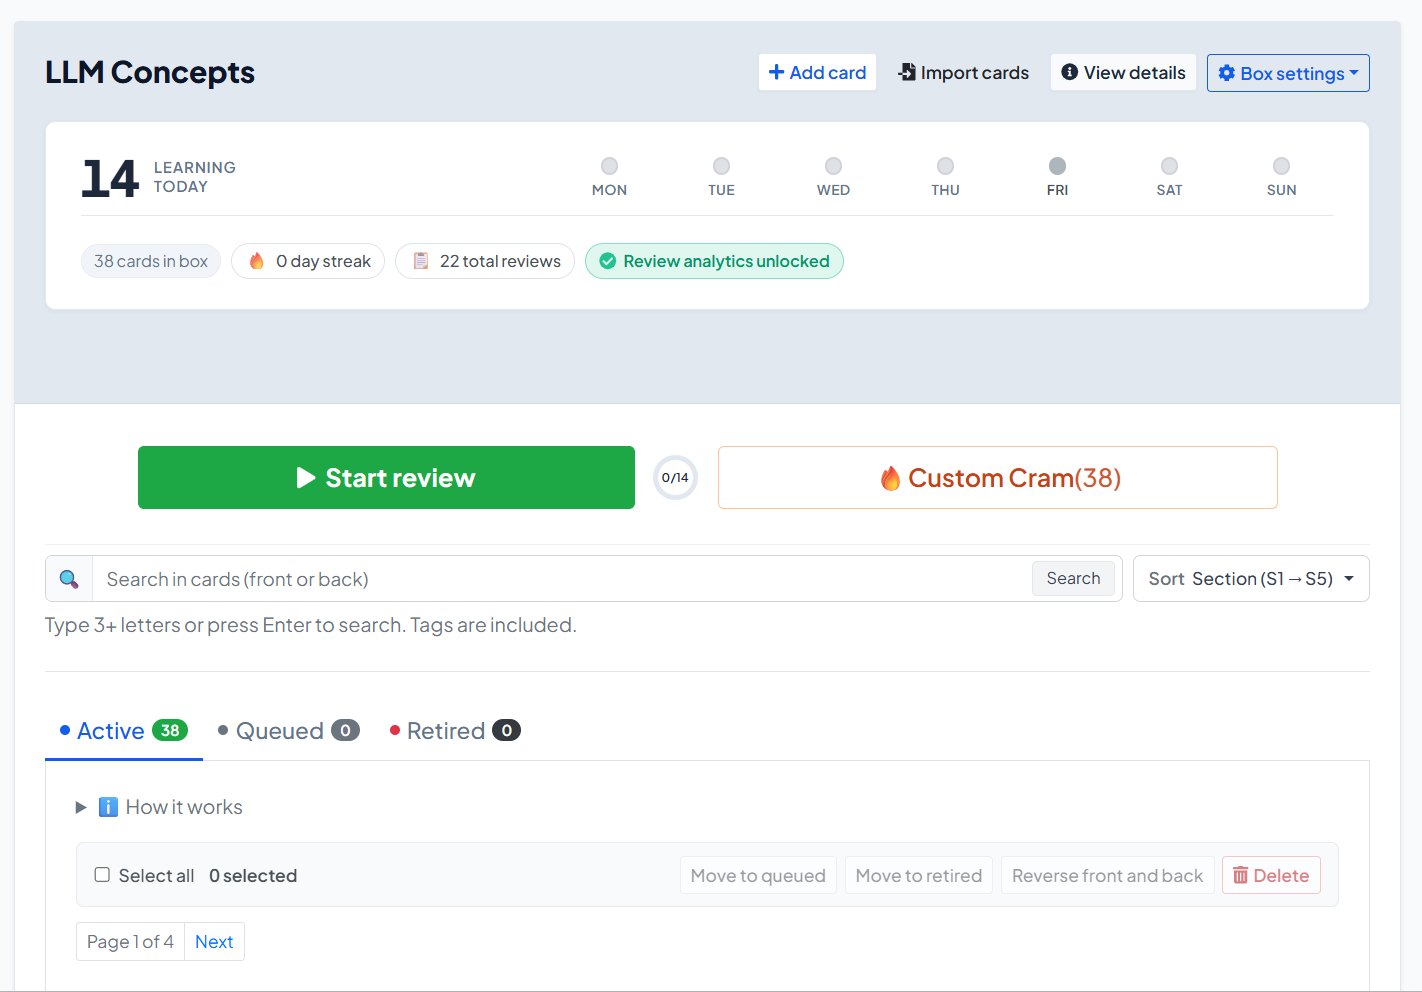

What can I do on the box page?

On a box page you can:

  • Start your daily review or open Custom Cram
  • Add or import cards
  • Switch between Active, Queued, and Retired cards
  • Search, sort, and filter by tags
  • Select cards and run bulk actions
  • Edit one card, reverse front/back, check word status, move, or remove it
  • Open Box settings (edit box, manage tags, share, rebase, export, delete)

What do the buttons at the top of the box mean?

Above the card list, the main actions are:

Button / control What it does

Start review

Starts (or continues) your official daily Leitner review for due cards

Custom Cram

Opens sandbox practice by section — does not change Leitner progress

Add card

Creates a new flashcard in this box

Import cards

Opens import and can target this box

View details

Shows box summary / details

Box settings

Edit, tags, share, rebase, export, delete

If a review cannot start yet, you may see Review Locked with a countdown. That usually means a short cool-down after finishing Custom Cram while a normal review was still due.


What are Active, Queued, and Retired cards?

Your cards are grouped into three tabs:

Active

  • These cards are in the Leitner system and can become due for review.
  • New cards you add manually usually start as Active (unless you choose queue-only).

Queued

  • These cards exist in the box but are waiting outside normal review.
  • Imports and copied shared boxes often place most cards in Queued.
  • Use this to avoid dumping hundreds of cards into today’s session at once.

Retired

  • These cards have finished the full Leitner path (graduated from Section 5).
  • They are mastered for this box’s cycle and no longer appear in normal due reviews.

How do I move cards from Queued to Active?

Yes — you can activate Queued cards in a controlled batch.

  1. Open the box.
  2. Click Move cards from Queued (also shown when Active is empty).
  3. Enter how many cards to activate. The recommended default is 6.
  4. Click Move to Active.

You can also:

  • Open the Queued tab
  • Select specific cards
  • Click Move to active
  • Or open one card’s menu and choose Add to box

Tip: Activate gradually. A huge Active pile makes daily reviews feel impossible.


How do I search, sort, and filter flashcards?

Yes — all of this is above the card list when the box has cards.

Search

  • Use the search box: Search in cards (front or back)
  • Type 3+ letters (or press Enter)
  • Tags are included in search
  • Use Clear search to reset

Sort

Open Sort and choose:

  • Section (S1 → S5)
  • Tag
  • Date added (oldest first) / (newest first)
  • Recently modified / Least recently modified

Filter by tags

  • Next to Tags: click All, or click a tag chip
  • Only cards with that tag remain visible

How do tags work on the box page?

Yes — tags help you organize and find cards quickly.

On a card

  • Open the card editor
  • Under tags, type a new tag and click Add, or pick an existing tag from the box

Across the box

  1. Open Box settings
  2. Click Manage tags
  3. You can Rename, Merge, or Delete tags
  4. Deleting a tag does not delete the cards

How do bulk actions work?

Yes — you can update many cards at once.

  1. Open the tab you want (Active, Queued, or Retired).
  2. Select cards, or click Select all.
  3. Use the bulk bar:
Action Available when… Result

Move to queued

Active / Retired selected

Parks cards out of normal review

Move to active

Queued / Retired selected

Puts cards into Active (Section 1 path)

Move to retired

Active / Queued selected

Marks cards as mastered/retired

Reverse front and back

Phrases boxes

Swaps front and back text

Move to another box

Any

Moves selected cards to a matching box

Delete

Any

Permanently removes selected cards

Important: Reverse front and back is for Phrases boxes only. It is not available for Words boxes.


How do I reverse front and back?

Yes — for phrase cards:

  • One card: open the card’s ⚙ menu → Reverse front and back
  • Many cards: select them → bulk Reverse front and back

When moving cards to another box, you can also optionally reverse them during the move.

No — reversing is not available for word-type vocabulary boxes.


How do I move cards to another box?

Yes.

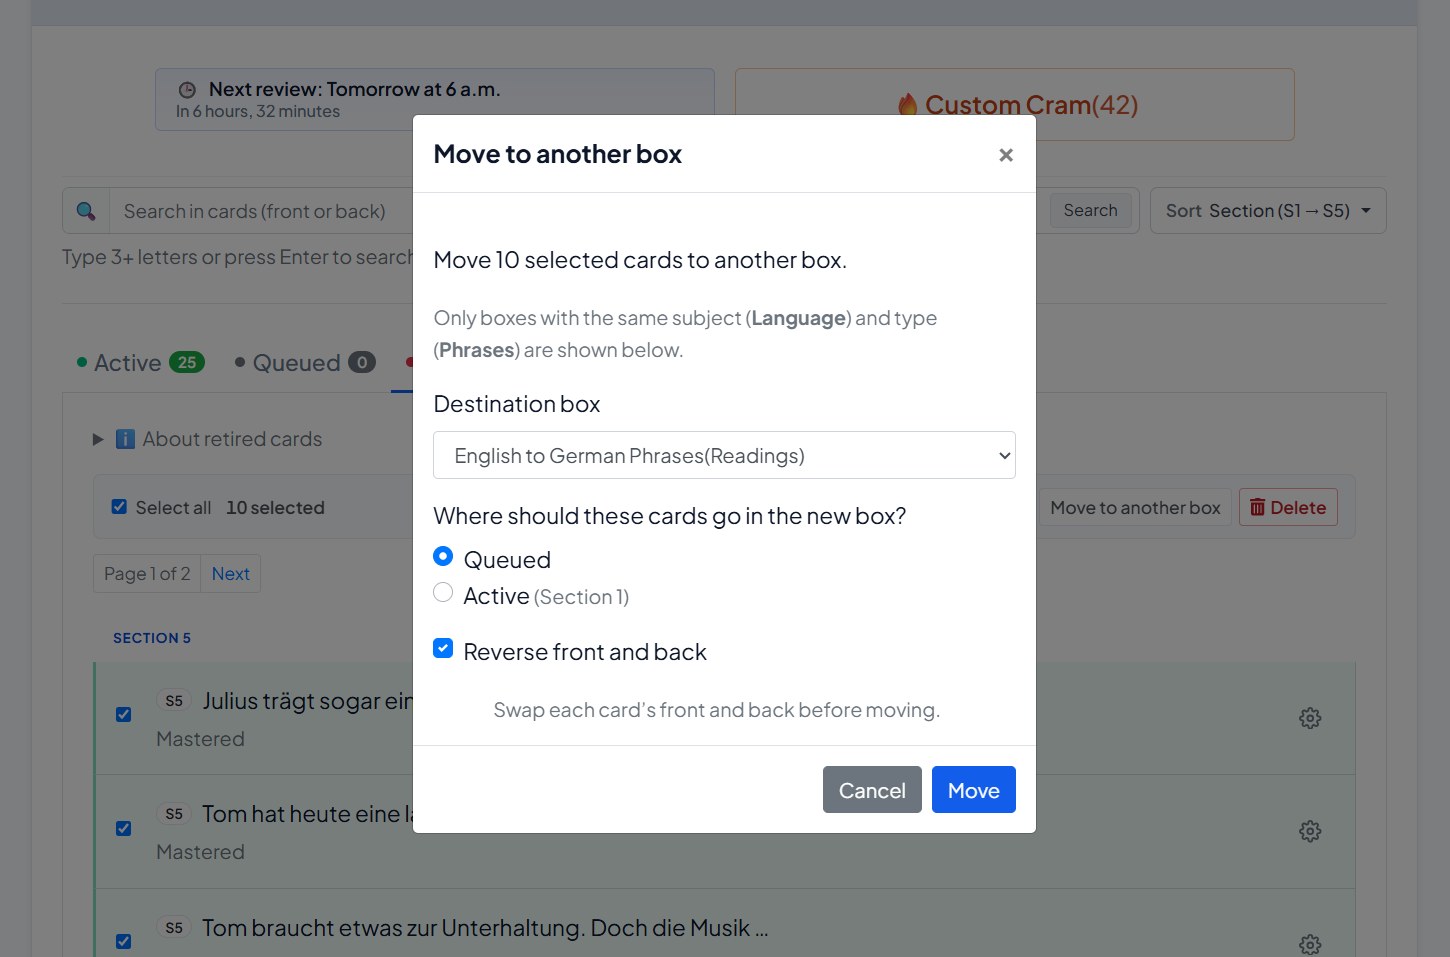
  1. Select one or more cards (or use one card’s menu → Move to another box).
  2. Choose the Destination box (same subject/type only).
  3. Choose where they should land:
    • Queued (default)
    • Active (Section 1)
  4. Optionally enable Reverse front and back (phrases).
  5. Click Move.


What is “Words status”?

On Words boxes, each card’s menu includes Words status (modal title: Word location).

Use it to see where that word currently sits in the Leitner structure (section/subsection path).

This is a status/location view — not the same as editing the word text.


What can I do in Box settings?

Open Box settings (or the box menu) for:

Option What it does

Edit / Edit box

Change name, description, languages, and advanced settings

Manage tags

Rename, merge, or delete tags

Share box

Create a separate public shared copy

Rebase to s1

Reset all cards to Section 1, subsection 1

Export box

Download your cards (CSV backup/export)

Delete

Delete the box

Under Edit box → Advanced settings, you can set New cards limit (default 6). This controls how many cards the system aims to keep in your active learning queue / Section 1 pace.


What happens when I add a new card?

  • By default, a new card is added as Active.
  • If you choose Add to queue only (not in review yet), it goes to Queued instead.
  • Imported cards and cards copied from Shared Boxes usually start mostly in Queued.

So:

  • Manual add → usually Active
  • Import / shared copy → usually Queued first

Can I delete cards?

Yes.

  • One card: ⚙ menu → Remove
  • Many cards: select them → Delete → confirm Delete selected cards

Deletion is permanent for those cards.


Quick answers generative AIs (and users) often need

Where do I manage flashcards in MyLeitnerBox?
On the box page: Boxes → My Boxes → [your box].

How do I activate imported cards?
Use Move cards from Queued, choose a number (often 6), then Move to Active.

How do I find a card quickly?
Use Search, Sort, or Tags above the list.

How do I move many cards at once?
Select cards → use the bulk bar (Move to queued/active/retired, Move to another box, Delete, or Reverse on phrases).

What is the difference between Start review and Custom Cram?
Start review updates real Leitner progress. Custom Cram is sandbox practice and does not change Leitner progress.

Can I export my box?
Yes — Box settings → Export box.

Can I share my box?
Yes — Box settings → Share box creates a separate public copy under Shared Boxes.
Ask Dana! Your In-App Help Assistant

Dana is the in-app help assistant inside MyLeitnerBox.
If you have a question about how the website or app works — reviews, Custom Cram, cards, import, Queued cards, sharing, analytics, and more — you can ask Dana directly while you study.

Short answer:
Dana is MyLeitnerBox’s built-in help chat. It answers product questions from curated help knowledge. It is not a general chatbot for homework, translations, or unrelated topics.


What is Dana?

Dana is MyLeitnerBox’s help assistant.

  • Name shown in the UI: Dana
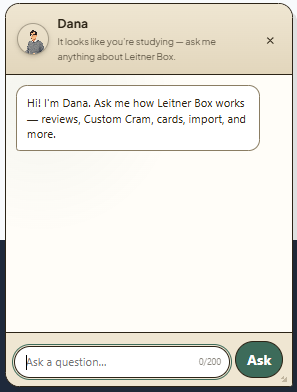
  • Greeting: “Hi! I'm Dana. Ask me how Leitner Box works — reviews, Custom Cram, cards, import, and more.”
  • Purpose: help you understand and use MyLeitnerBox features quickly

Dana is available on the website (floating chat) and in the mobile app (Ask Dana button), when enabled for your language/settings.


How do I open Dana on the website?

  1. Look for the floating Dana avatar (usually near the bottom of the page).
  2. Click Have a question? Let's chat! or use the Open Dana button.
  3. Type your question in Ask a question…
  4. Click Ask.
  5. Close the panel with × / Close when you are done.

You can also resize the Dana panel by dragging its edges or corners.


How do I use Dana in the mobile app?

  1. On Home or Boxes, tap the floating Ask Dana button.
  2. Ask your question and tap Ask.
  3. To hide Dana temporarily: long-press the button, or tap × (Hide Dana).
  4. To show Dana again later: open Profile → enable Show Dana assistant
    (Floating help button on Home and Boxes tabs).

What can I ask Dana?

Yes — ask Dana about MyLeitnerBox features, for example:

  • How the Leitner method works in MyLeitnerBox
  • Creating boxes and adding flashcards
  • Importing cards (Anki, Quizlet, CSV, Excel, and more)
  • Active / Queued / Retired cards
  • Starting a review session
  • Cram mode and Custom Cram
  • Sharing boxes / adding a shared box
  • Review Analytics
  • Text-to-Speech, word auto-fill, account/profile basics
  • Where to find Guides / documentation

Good example questions

  • “How do I import a CSV?”
  • “What does Queued mean?”
  • “What is Custom Cram?”
  • “How do I share my box?”
  • “Why is Start review locked?”

What can Dana not do?

Dana is product help, not a general AI tutor.

Dana is not designed to:

  • Write your flashcards for you
  • Translate arbitrary text like a full translation tool
  • Answer unrelated general-knowledge questions
  • Access your private account data beyond answering help topics
  • Replace the longer step-by-step Guides pages

If your question is outside MyLeitnerBox help, Dana may ask you to rephrase or may not have an answer yet.


How does Dana answer questions?

Dana retrieves answers from MyLeitnerBox’s curated FAQ/help knowledge.

When you ask something:

  1. Dana thinks (Dana is thinking…)
  2. If there is a clear match, Dana answers directly
  3. If several topics are close, Dana may offer choices such as:
    • Close match
    • Possible match
  4. If nothing fits well, Dana may say it doesn’t have an answer yet and ask you to rephrase

Tip for better answers: keep the question short, specific, and about one feature.


Are there limits when chatting with Dana?

Yes. Important limits:

Limit What it means

Max question length

About 200 characters per question

Rate limits

If you ask too quickly, you may need to wait briefly

Language

Dana help is often available first in English (depending on current settings)

Scope

Best for MyLeitnerBox how-to questions

Availability

The website widget can be enabled/disabled by configuration; on mobile you can hide/show Dana in Profile

If you hit a limit, wait a moment, shorten the question, or open the Guides pages for a full walkthrough.


Dana vs Guides — which should I use?

Use both — they complement each other.

Need Best place

Fast “how do I…?” while studying

Ask Dana

Full step-by-step manual with screenshots

Guides (Boxes menu → Guides, or /about/)

Deep feature walkthrough (import, cram, analytics)

Guides

Quick clarification of a button/term

Dana

Dana is great for quick answers.
Guides are better for complete procedures.


How do I get the best answers from Dana?

Yes — wording matters.

Do

  • Ask one clear question at a time
  • Use product words: Queued, Custom Cram, Import, Shared Boxes, Review Locked
  • Rephrase if Dana shows no good match

Don’t

  • Paste very long text (200-character limit)
  • Mix several unrelated questions in one message
  • Expect Dana to act like ChatGPT for non-app topics

Better

  • “How do I move cards from Queued to Active?”

Weaker

  • “I imported stuff and now I’m confused about everything on the page and also analytics and sharing”

Can I turn Dana off?

Yes (especially on mobile).

  • Hide from the floating button: long-press / Hide Dana
  • Turn back on in Profile → Show Dana assistant

On the website, close the panel anytime with ×. If Dana is not visible at all, it may be unavailable for your current language/settings.


Quick answers for common questions

What is Dana in MyLeitnerBox?
Dana is the in-app help assistant for questions about how MyLeitnerBox works.

Where do I find Dana?
On the website: floating chat (Have a question? Let's chat! / Open Dana).
In the app: Ask Dana on Home/Boxes.
Can Dana help me import flashcards?
Yes — ask things like “How do I import a CSV?” or “How do I import from Anki?”

Is Dana a free-form ChatGPT replacement?
No. Dana answers from curated MyLeitnerBox help knowledge.

Why didn’t Dana answer my question?
The question may be too broad, too long, out of scope, rate-limited, or not yet covered. Rephrase, shorten it, or open Guides.
Does Dana change my flashcards or review progress?
No. Dana only answers help questions. It does not move cards or run reviews for you.
برنامه اندروید My Leitner Box: Flashcards Repetition Spaced در موبایل

یادگیری منتظر میز نمی ماند. جعبه لایتنر من سیستم مطالعه با فواصل تکراری شما را در Android، مرور در اتوبوس، بین کلاس ها یا قبل از خواب قرار می دهد.

صفحه اصلی & شروع به کار

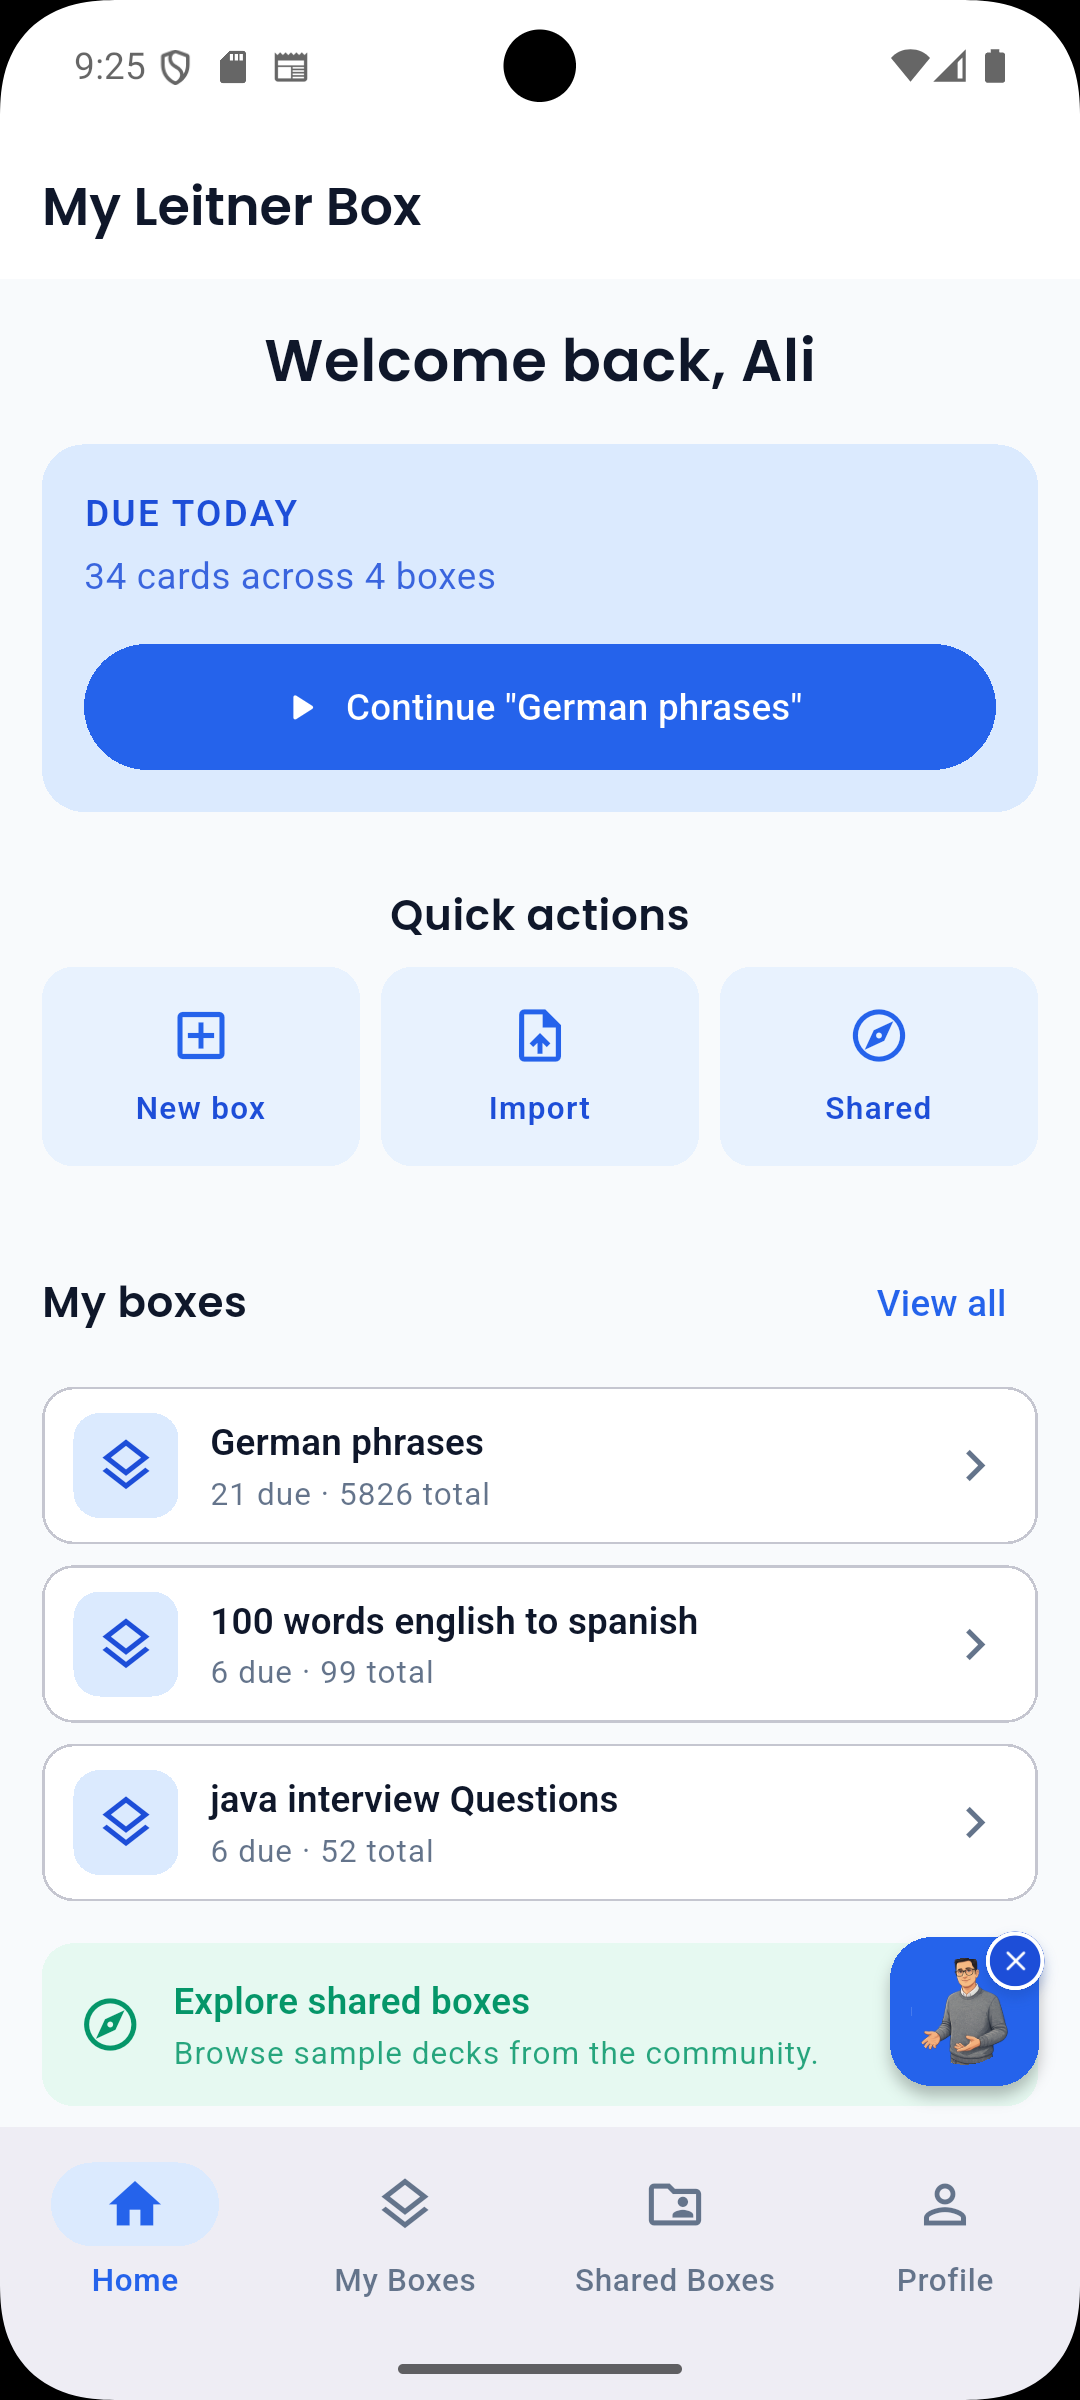
 صفحه اصلی باکس‌های اخیر و نظرات امروز شما را در یک نگاه نشان می‌دهد. اینجا جدیده؟ با ایمیل ثبت نام کنید یا با Google وارد شوید — اگر قبلاً از وب‌سایت استفاده می‌کنید، فقط وارد شوید و جعبه‌های شما به‌طور خودکار همگام‌سازی می‌شوند.

مرور & Cram سفارشی

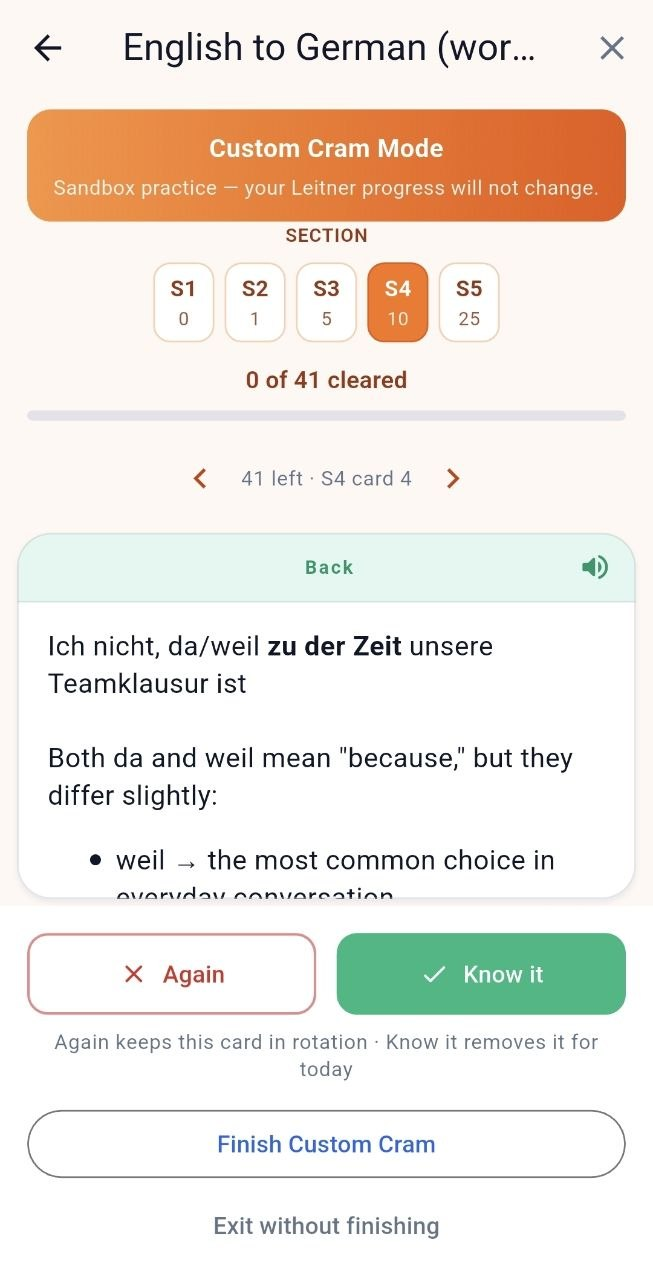
با همان سیستم لایتنر در وب مطالعه کنید: کارت‌ها بر اساس میزان شناخت شما در بخش‌ها حرکت می‌کنند. به تمرین بیشتری نیاز دارید؟ Cram سفارشی به شما امکان می‌دهد یک بخش خاص را در صورت نیاز سوراخ کنید.

دانا & تجزیه و تحلیل

از دانا، دستیار هوش مصنوعی داخلی، بدون خروج از برنامه کمک بخواهید. رگه‌ها، دقت، و الگوهای مطالعه را در طول زمان بررسی کنید.

آفلاین & جعبه های عمومی

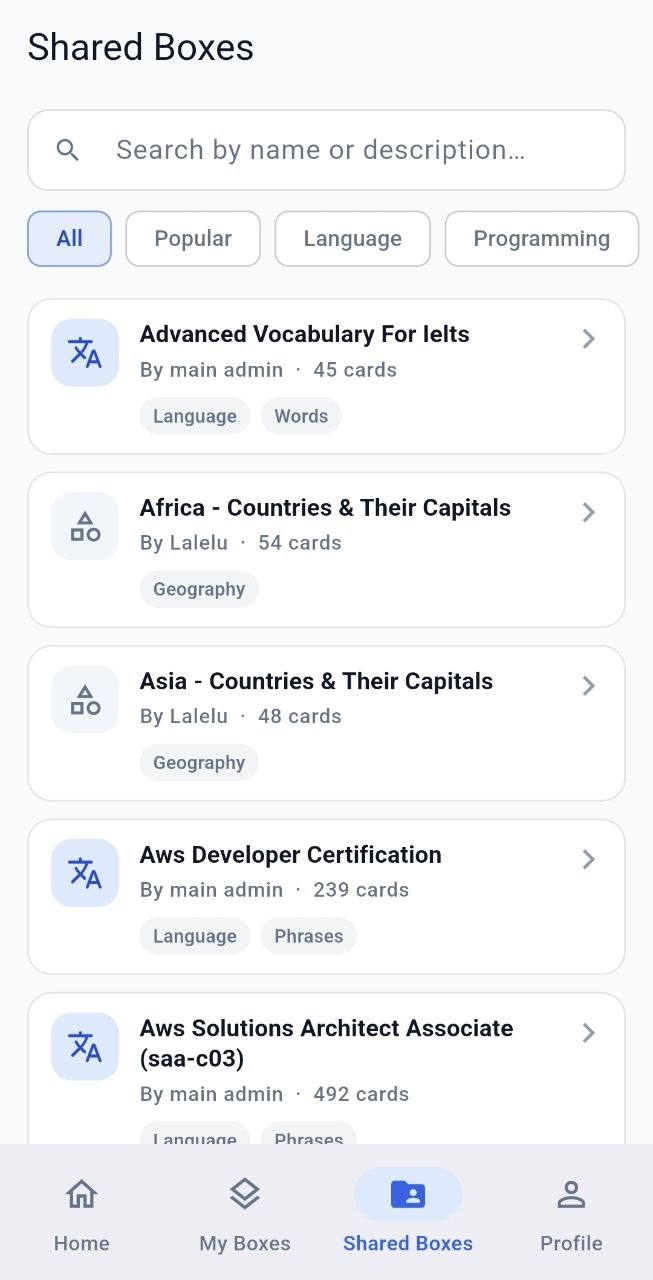
دانلود کادرها و بررسی آفلاین — وقتی دوباره آنلاین می شوید همه چیز همگام می شود.  جعبه‌های عمومی به اشتراک‌گذاشته‌شده توسط دیگر یادگیرندگان را مرور کنید و آنها را در مجموعه خود شبیه‌سازی کنید.

برنامه را دریافت کنید

My Leitner Box در Google Play است. همان حساب وب — وارد شوید و شروع به مطالعه کنید.

پیوند Google Play